Saturday, December 2, 2023

media backup - checklist

I have 2.5 other posts on this backup, so nothing in-depth is covered here. The steps I can recall and a few tips. A repeat at the top of the challenges.

The Challenges

It's likely not a mistake that there's a laborious manual process instead of a simple software solution for the common need of backing-up media. I smell entertainment attorneys.

  • every backed-up CD becomes a folder of MP3's. To recreate playing a CD, a person would have to sit at their computer and click each MP3 file in CD sequence, or else make the entire CD into a single large file.
  • M3U files play MP3 files in sequence, eg in the same sequence as the CD. A large catch (also probably DRM-related) is that M3U files must contain hard links -- a complete system specific path -- to media files for the M3U to function. Thus, any portable, relative link solution is prevented. Further, entering hard links into M3U's must be done manually, and these long links increase the chance for fatigue and entry errors.
  • Most browsers disable (probably due to industry pressures) M3U files from opening, and will only download the M3U without playing these laboriously entered MRL links

NB Time: if a person has the real estate, the industry has made it easier to simply leave media on the shelf and pull it off when a person wants to listen. Backing-up a 100 CD collection takes about 75 hrs (4500 mins), ie, about 2 work weeks. It's worth it, of course, if there's any attachment to the collection.

NB Hard Links: an HTML interface will provide access similar to the original physical disks, with a 'forever and in a small space' fillip. However, the first job is to find a browser that will open links to M3U's. This is probably a moving litigation target, but currently Falkon opens them, albeit with an additional confirmation step in each instance.

NB M3U's: these carry a lot of information, in addition to links. Additional listens over the years allow a person to flesh comments on every track, as much as they want, without affecting playback, or being displayed. They are a private mini-blog for the listener to add info, times, additional versions, or to make new M3U mixes, etc. Protect at all costs.


configure (possibly 1 work day)

  • partition(s) for external backup disk, probably using XFS these days (2023), and a micro usb.
  • fstab is a PITA. It has to be modified to mount the drive you've got the media on, in order for the hard links in M3U's to work. However, a modified fstab will cause boot to fail into maintenance mode if I boot/reboot the system without that drive (I usually specify /dev/sdd for the USB drive) connected.
    So at boot, return fstab to default. After boot, remodify fstab with the dev and run "mount -a". Anyway, that's how f'ed up these WIPO organizations have made having a media drive.
  • Touchscreen and a 3.5mm connector(speakers) + usbc (backed up external)
  • consider file structure: music,images, m3u's, booklets art, video versions, slower versions (for mixes, etc).
  • configure XDG for xdg-open to open M3U's with preferred player
  • review/establish ~/.config/abcde.conf and verify an operational CDDB. The CDDB saves at *least* 5 mins per disk. In lieu, must enter all track names and artists, etc.

backing up (30mins per CD)

  • abcde the shit to 320kb
    $ abcde -d /dev/sr0 -o mp3:"-b 320" -c ~/.config/abcde.conf
  • while abcde, scan (xsane) cover art and booklet to 200 or 300 dpi, square as possible
  • create PDF of booklet/insert (convert jpgs), and save front for easytag and HTML thumbnails
  • << above 3 should be done simultaneously, aiming for 15 mins per disk >>
  • easytag the files and clean their names, attach cover jpg/png.
  • create m3u's for each disk (geany, gedit, whatever)
  • << above 2 roughly 15 mins per disk >>

post-processing (15 mins per CD)

  • download a browser that will not block M3U's, eg Falkon.
  • start building your HTML page
  • enter each file's relevant info into the schema
  • create 100x100 thumbnails for faster webpage loading
    $ mogrify -format png -path /home/foo/thumbs -thumbnail 100x100 *.jpg

tips

  • keep MP3 file names short, since they have to be hand entered into the M3U. Longer names can be in the ID3 tag, and/or M3U file. Both the ID3 info, and especially the M3U file, can accept additional information later, at one's leisure.
  • typos waste a lot of time and break links. Cut and paste whenever possible for accuracy.
  • leave the HTML interface file continually open in the same text editor as for the M3U's. Geany is an example. There are continual modifications and touch-ups to the HTML page, even as I open and close various M3U's. And a lot of copying and pasting from the M3U's into the HTML file.
  • Geany has a search and replace function. When creating the M3U for a CD, a person can copy an existing M3U into the folder of the CD they are working on, and use it for a template. Just rename it for the current CD, and then use the search and replace function to update the all the links inside the M3U with a single click. A person can then start editing the song names without having to do all the hard link information again. Saves time.
  • run the scanner every so often without anything and look at result to see if glass needs cleaning
  • make an M3U template else continually waste 5 mins eliminating prior entries from the one copied over. Every CD will need an M3U to play all of its songs.
  • This is good software cuz it has melt included for combining MP4's

Monday, November 27, 2023

xdg mime, usb mounts

If we have to jettison our physical CD's and DVD's in the name of space, we unfortunately must back them up first. At that point, we lose the convenience of...

  1. easy playback (pull the CD/DVD off the shelf, put it in a player, and press 'play')
  2. in lieu of pressing 'play' in a player, how do we play an entire set of MP3's from a CD with a single click?
  3. global selection is lost (how do we easily observe our entire collection of CD's/DVD's, as we used to on on a shelf?)
  4. the portability of a bookshelf CD player is gone, and we now require a device with an interface to select and play the music

solution

Turns-out that 1, 2, and 4 are related questions. We can create an M3U for each CD (not a trivial task), then create an HTML page with hyperlinks to the M3U's. So when we click the HTML link from our browser, the M3U is opened by the default application (eg. VLC) which plays the CD's MP3's in the order they used to be on the CD.

This fundamentally solves problems 1 and 2. And since HTML pages open on nearly any device with a web browser, we have a good start on solving problem 4.

To solve problem 3, perhaps we can also eventually add thumbnails -- a thumbnail for each CD -- to our HTML page, and then embed an M3U link into the thumbnail: see a thumbnail for a CD, click the thumbnail. Since we can place infinite thumbnails on an HTML page, we can likely see our entire collection on a single webpage. At that point, we'd only need to consider what device and speakers to connect, the hardware.

This is a fairly simple schema, and attainable, but it's a significant investment of work: we must create an intuitive HTML page, and multiple M3U's. The CD's song order and file locations cannot be determined by the application (eg, VLC) without an M3U, so an individual M3U must be created for each CD, and for any mixes.

nested additional problem

We want to open our HTML file in a browser to click on a link to the CD's M3U. However links to M3U's have no default application and thus do not natively work when clicked in browsers. So now our job is two-fold.

  • We must create functional M3U files
  • We must configure our browser or OS to make hyperlinks to M3U's click-to-play. That is, we must associate an application with the HTML link. The OS uses XDG to manage these associations.

xdg 'desktop' files

The XDG system is a script which connects file types and applications. Suppose our browser is Chromium and we click on a website link to a PDF. Chromium makes a call to the XDG system (xdg-open). If we've registered an app for our PDF fileswith XDG, the application (eg. Evince) opens the PDF.

It's a chain, so if we haven't registered a default for PDF's in XDG, Chromium's call to XDG produces no information. In these circumstances, Chromium simply downloads the PDF. XDG itself has its own files and file types with which it makes these connections. We'll configure XDG to connect the M3U to VLC, the same way it connects a PDF to Evince.

This seems simple, but later we will find out that Chromium refuses to open M3U's even when XDG is properly configured for it. See "troubleshooting" further down the page.

m3u xdg registration

Our clickable schema depends on M3U's being played from the browser. However, XDG does not typically have a default application for M3U's. Until we configure one, browsers that contact XDG get no information. As noted above, browsers typically just download the M3U file. In order for the browser to process a click on an M3U hyperlink (without downloading), we must create an association between M3U's and an application. XDG manages this.

add a file type (arch) scroll down to xdg-open and perl-mime-types. Perl mime types is straightforward, and this worked IME. informative arch page. see also their additional page.
add a file type (stack) add an existing file type.
add a file type (stack) the most thorough description. Includes syntax for any file type.
add a file type (superuser) another method, slightly more superficial, for existing file types. Create a desktop file then add to mimeapps.list or run xdg-register.
add a file type (askubuntu) have an existing file type and need to associate it with an application.
list of associations (unix exchange) how to get a list of default file apps.

configure m3u

Verify M3U is already defined within the XDG system.

$ xdg-mime query filetype foo.m3u
m3u: audio/x-mpegurl

...or...

# pacman -S perl-mime-types [incl mimetype]
$ mimetype foo.m3u
m3u: audio/x-mpegurl

...then, to associate it to vlc, or whatever player....

$ mimeopen -d foo.m3u

...verify that (in this example) vlc was associated with it...

$ xdg-mime query default audio/x-mpegurl
vlc.desktop
# update-desktop-database
# update-mime-database

...or...

$ update-mime-database ~/.local/share/mime

verify file opens natively via xdg

$ xdg-open foo.m3u

it should open with vlc.

thumbnails

We need thumnails of CD insert/booklet art for our omnibus music page. Imagemagick is our friend for processing an entire directory of photos to provide us with thumgnails. NB: not sure which of its commands is destructive or additive resize, mogrify, or convert.

$ mogrify -format gif -path /home/foo/thumbs -thumbnail 100x100 *.jpg

troubleshooting

1. M3U access through browser

Install a browser such as Falkon which respects XDG settings for M3U's


Chromium will not open an M3U. Probably a DMCA protection, since M3U's can be built to do streaming, not simply play local files the way I use them. Priority (top of foodchain) is supposed to be the ~/.config/mimeapps.list, but Chromium does not honor any XDG M3U settings or files.

IME, the simplest, fastest solution to this Chromium problem is to install a browser such as Falkon, which respects xdg-open settings. For our music schema to work, we need a browser to open our HTML files.

$ cat .config/mimeapps.list
[Added Associations]
application/pdf=org.gnome.Evince.desktop;
image/jpeg=geeqie.desktop;
text/plain=org.gnome.gedit.desktop;
image/png=geeqie.desktop;
image/gif=vlc.desktop;geeqie.desktop;
video/mp4=xplayer.desktop;
video/mpeg=xplayer.desktop;
application/octet-stream=org.gnome.gedit.desktop;

[Default Applications]
application/pdf=org.gnome.Evince.desktop
image/jpeg=geeqie.desktop
text/plain=org.gnome.gedit.desktop
image/png=geeqie.desktop
image/gif=geeqie.desktop
video/mp4=xplayer.desktop
video/mpeg=xplayer.desktop
audio/x-mpegurl=vlc.desktop;

2. browser path requirements lead to permanent mount point naming

Create a mountpoint and identical /etc/fstab entry. Put it on all devices that need access to USB external drive. All links in our music setup will use these links.


Seems impossible but, when a browser opens an HTML page, the links to M3U's cannot be just the file, eg. "foo.m3u", even if the M3U is in the same folder with the HTML file. We're not used to this. HTML files easily display photos in the same directory or in a subfolder such as 'images'. But for the M3U to open, it must be called with the complete path to the file starting from its mount point eg, "/run/media/[USER]/[LABEL]/music/foo.m3u".

This poses a problem for the user. Each computer has a different username, and the "run" mountpoint is temporary. Gvfs or fusermount inserts the USER and partition LABEL when it mounts the drive, eg, /run/media/[USER]/[LABEL]/. But we can't change the HTML links to our 100+ M3U files every time we mount the USB back-up drive in a different system.

To pass the environmental variable of '$USER' into our URL is also not easy due to security problems with URL's on non-local systems that connect to internet. I tried USER, $USER, %USER%, 'USER', '$USER', '%USER%', `USER`, `$USER`, and `%USER%`. None worked.

To obtain USER, we simply whoami or a larger list of environmental variables with printenv. To determine LABEL, we can of course use 'lsblk', or the more complete...

$ lsblk -o name,mountpoint,label,size,uuid

The next level is a udev rule or fstab configuration that I would place on any machine I use with the backup drive. But GVFS is extremely powerful and udev, fstab, etc may only unreliably/unpredictably override GVFS.

I decided to try an fstab addition since this post (scroll down) made it seem the simplest solution. If I had done the udev rule, the persistent naming setup would have been from kernel detection.

In either case, we basically want to override gvfs when the UUID or LABEL of the backup USB is detected. Unfortunately, we will never be sure GVFS might be fickle on some system and disallow being overriden by /etc/fstab. But we must attempt it, otherwise we cannot use HTML and a browser to manage the media collection. The process is from this post.

  1. Create a permanent mount point. "run/media" is a temporary file system used by GVFS. I decided to create /mnt/[label], where 'label' is the label of the partition. In this case...
    # mkdir -p /mnt/bigdata
  2. update /etc/fstab, then do systemctl daemon-reload
    # nano /etc/fstab
    # UUID=ba60a72e-0db3-4a5f-bea5-c3be0e04cda1 LABEL=bigdata
    UUID=ba60a72e-0db3-4a5f-bea5-c3be0e04cda1 /mnt/bigdata xfs rw,auto,user 0 0
    # systemctl daemon reload
    # mount -a
  3. With the "mount all", the device should load and at that directory with proper permissions. We can verify...
    $ cat /etc/mtab
    /dev/sdd1 /mnt/bigdata xfs rw,nosuid,nodev,noexec,relatime,attr2,inode64,logbufs=8,logbsize=32k,noquota 0 0
    ...and of course try a test write and erase to the drive to verify user permissions.
  4. Now whenever we create a hyperlink in our music oversight HTML file, we can use a persisting, cross-platform, link. Eg, for the M3U, we might have an address of /mnt/bigdata/foo.m3u in the link. If we connect to any other systems, 1) create /mnt/bigdata, and 2) modify their fstab. All links to music and M3U's in our HTML page should then work.
  5. The USB drive will *not* appear in our temporary drive list in our file manager. We'll have to navigate to /mnt/bigdata to see or edit the drive's contents.

Saturday, November 25, 2023

crucial x6 (Micron - 0634:5602)

This is a $199 (early 2023)/$150 (late 2023) 4TB USBA (3.2) <-->USBC (Android) external SSD drive. We're capped at about 800MB of data transfer, but being external obviates annoying NVMe (PCI only) issues. With SSD's, only writing, not reading, decreases their lifespan. I'm thinking of these in terms of 10 year lifespans.

$ lsusb
Bus 003 Device 009: ID 0634:5602 Micron Technology, Inc. CT4000X6SSD9
$ lsblk
sdc 8:32 0 3.6T 0 disk
├─sdc1 8:33 0 128M 0 part
└─sdc2 8:34 0 3.6T 0 part /run/media/foo/Crucial X6
$ cat /etc/mtab
/dev/sdc2 /run/media/foo/Crucial\040X6 exfat rw,nosuid,nodev,relatime,uid=0500,gid=0500,fmask=0022,dmask=0022,iocharset=utf8,errors=remount-ro 0 0

FS considerations

The X6 comes with an extended FAT (exfat) 3.6TB partion and thus syncs to MSoft devices with an added file management area "System Volume Information" of about 128Mb. Should we keep the exfat? Extended FAT has an upper recommended partion limit of 512Tb, so the drive is well-within it's useful partition size, and it's also compatible with Apple devices. YMMV but, in my systems, I prefer zero MSoft either in applications, file systems, or anything else.

A person might next consider formatting to ext2. I've found it reliable for more than a decade. However 2038 is the final time-stamp date available for ext2 files -- ext2 was released in 1993 -- so ext2 is unfortunately nearing some expiration considerations.

Luckily, any FS we want will do fine: external drives don't need to boot, and we only need a single partition to store data. BtrFS supposedly has flexible inode size (so can manage smaller and larger files side by side), but Oracle was involved in its development. Currently, I believe xfs is worth a try, in absence of ext2. Xfs is the default on RedHat systems so it has active development. As for ext4, this Reddit post compares ext4 and xfs. We may also want to soon consider zfs, since it's gaining momentum with large stakeholders.

XFS

Pretty sure xfs will not natively mount in a Windows or iOS systems and has the option of encryption, but it also has a drawback: appropriates journaling space. RedHat has info, of course, and the Arch guide is also good. XFS.org also has its own FAQ.

# umount /dev/sdc
# gparted /dev/sdc [eliminate present stuff, add xfs partition]
# mkfs.xfs -L "bigdrive" /dev/sdc1
# xfs_repair /dev/sdc1
# chown 0500:0100 /run/media/foo/bigdrive

The reason for the xfs_repair is to verify it formatted successfully.

The reason for the chown: for some reason, gvfs mounts xfs as root:root (0:0) instead of the standard user:group setup. Since gvfs mounts other USB drives to group 100, I chown-ed the drive to UID:group, that is to 0500:0100. Can also chown to 0500:0500 if desired, that is user:user (supposing, eg one's UID were 500).

I only had to chown it once and gvfs subsequently auto-mounted the drive with the correct permissions.

If stripe and strip parameter warnings appear, read this and ignore them. That's for RAIDs.

Monday, November 20, 2023

media back-up

This post deals with audio CD's and DVD video -- I have no BluRay media. And it's sort of a worst-case scenario, one where a person can't physically save their media. I've learned an immense amount because it looks like an straighforward project, but it's not. I've written another blog post covering most of the remainder of it.


I recently cleared-out my storage area. I hadn't been in there in 17 years. A few boxes of CD's and DVD's were part of the contents, and the memories of the times when I purchased the media surged in an instant. They welled-up so quickly and powerfully that I choked-up. How had I become so weak and disfigured? Uncomfortable insights.

In spite of such anguish, a person is unlikely to trash the media. It's natural for a person to honor their history. At some point, I want to light a cigar, take a keepsake media disc off a shelf, and put it in a player for a rewatch/relisten.

If no home with a shelf, then very small storage areas can still be rented for what we used to pay for large ones. Ie, rent for what used to be an 8x10', might now rent a 4x4'. A 4x4 can hold a few CD's and a few papers, etc. Maybe $45.

Minus a millionaire's floorplan or an affordable storage area, a person realizes their options are down to one: back the media up, probably in some mediocre fashion/bitrate without cover art, and probably without individual tracks or chapters. Is it even worth it at all? As in every other post on this blog, the answer is "it's entirely up to you", and "the info here pertains to Linux". I found it was worth it for some discs, and others I just threw away. It's about 20 mins per CD, and about X mins per DVD.


TLDR

audio: 20 mins per CD

  • abcde to backup the files and to import online CDDB data for ID3 tags. Verify the fetching CDDB URL inside abcde.conf
  • Easytag (or some ppl prefer picard) to clean up ID3 tags.
  • Sometimes groups of MP3's will require renaming. Gprename can hasten this.
  • Cover art files do not always download and will not be the complete inner notes. While abcde is working, scan the inner liner at 200-300 dpi as close as possible to a square (1:1) crop
  • Later, can make thumbnails for the HTML oversight page.
$ abcde -d /dev/sr0 -o mp3:"-b 320" -c ~/.config/abcde.conf

dvd: handbrake to backup the files.


playback note

See my post, which suggests an HTML/M3U file solution. Some may wish to install LibreELEC and Kodi in an old laptop to work as a "CD player". All of the engineered "media manager" products are bullsh*t IMO -- more concerned with phoning home your collection than any other task. A simple HTML page works much faster, and more reliably and configurably.

If we formatted our external back-up drive with XFS, then it will not work with a Windows or Mac device. So we will at least need some device to access the files. And a 3.5mm jack in the device, to move the audio to a computer speaker system or some headphones. Alternatively, we could design some static web pages and make thumbnails of of the CD covers with built-in links to playlists or which open the folders and play the contents. The specs for m3u's are here.

Although I run icewm, my MIME settings are handled by xdg. So it will play an MP3 link, but download an M3U link.

$ xdg-settings get default-web-browser
chromium.desktop

Applications work as .desktop files. Not sure.

audio 90-100Mb per CD

Time and discwise, a CD like Fleetwood Mac's Rumours, about 40 mins long, takes about 12 min to rip and transcode at 320k. The 320K bitrate leads to a 90Mb folder of files, or roughly 2.3Mb per minute (at 320Kb). I find 90Mb per CD unproblematic at today's drive prices.

Quality wise, I prefer a full 320Kb MP3, esp if the music is nuanced with flanging or orchestration. IMO, 192K can be OK, but 128K is definitely not OK unless just a speech or some such.

Probably abcde is still the easiest attack on a stack of backup CD's. We need some way to save id3 information, and probably edit it (eg, easytag). Installing abcde will also pull-in python-eyed3. I installed glyph out of an abundance of caution for photo embedding.

$ yay -S abcde id3 python-eyed3
# pacman -S glyph id3v2

audio - abcde use and config

Abcde has an old school text conf file. Get the skeleton from /etc and copy it to wherever to edit it, eg ~/.config, then do edits like the CDDB URL and save. Next, adjust the URL where abcde finds ID3 information to populate the files.

$ cp /etc/abcde.conf ~/.config/abcde.conf
$ nano ~/.config/abcde.org
CDDBURL="gnudb.gnudb.org/~cddb/cddb.cgi"

When executing, the config file is called with the "c" flag and path.

$ abcde -c "~/.config/abcde.conf"

Abcde does not rip directly to MP3; it rips the entire CD to WAV's (10 mins), then converts each WAV to whatever number of other formats we want. From rip to conversion to one other format is about 12 mins per CD. Native MP3 conversion bit rate is 128k. Of course, if a person simply wants the WAV's, then use the defaults, eg $ abcde -d /dev/sr0.

For this project I'm likely to to specify MP3's at 320kb, though a person can specify what they like (or leave off the ':"-b 320"' for 128k).

$ abcde -d /dev/sr0 -o mp3:"-b 320"

audio - ID3 info

ID3 is no longer reliably being developed and there are different versions which might conflict. Of the versions, I consider ID3v2 compatible with nearly any player and therefor a reliable ID3 format for my MP3 files. ID3v2 is also supposedly the ID3 version EasyTag apparently uses. So after first tagging some MP3 files with EasyTag, I verified the ID3 version by installing id3v2. Then I ran its utility in a terminal, $ id3v2 -l [name].mp3, to verify my ID3 tags were version 2, ie, ID3v2.

$ id3v2 -l 02.Dreams.mp3
id3v2 tag info for 02.Dreams.mp3:
TIT2 (Title/songname/content description): Dreams
TPE1 (Lead performer(s)/Soloist(s)): Fleetwood Mac
TALB (Album/Movie/Show title): Rumours
TYER (Year): 1977
TRCK (Track number/Position in set): 02/11
TCON (Content type): Rock (17)
02.Dreams.mp3: No ID3v1 tag

Even with a functional CDDB URL in our ~/.config/abcde.conf , we often need to do the ID3 and art manually.

# pacman -S easytag
$ yay -S gprename

audio - ID3 art

It appears EasyTag only recognizes photos if gdk-pixbuf2 is installed.

# pacman -S gdk-pixbuf2

I arrange the scanner (xsane) for 300dpi, and preview the image close to a square. The resulting scan I then then scale. Get the WxH to about 1400x1400. This makes about a 500Kb file to add to each music file in that folder, so if 10 files in the CD, it adds 5MB to the entire folder. The 1K x 1K pic will display pretty sharp if running the file in VLC. Not sure other players. If I have an internal booklet in the CD, I scan it all and make a PDF to put in the folder.

Adding the art: put the image in the directory with the MP3's, open EasyTag in that directory, selecting all the files I want to receive that image (typically cover image). Then I go to the right and select "images" tab, add the pic with the "+" icon, and saving it to the files. A person will figure it out fast.

Removing art is fickle. I can do it in EasyTag, but it seems to stay in the VLC cache so I can never be sure. A sure way is to 1) Delete the directory for VLC album art: ~/.cache/vlc/ and, 2) go nuclear via "cd"ing into the music files directory and then...

$ id3v2 -r "APIC" *.mp3

audio - manual tasks

If I find old directories full of WAV's, like CD's I made back when, or whatever, I can batch convert the WAV's into 320k cbr MP3's.

$ for f in *.wav ; do lame -b 320 $f ; done

If I find a track that I want to slow it down (I don't mind pitch) and put a 0.8 speed version in the CD directory, perhaps to use with mixes, then...

$ sox foo.mp3 -C 320 foo8.mp3 speed 0.8

If I want to combine all the tracks in the CD into a blob, so I can play easily when driving or whatever...

$ sox foo1.mp3 foo2.mp3 foo3.mp3 output.mp3

There's a lot more about sox here.

Then I can get the art for it online or design something. Either way, put it in the folder with the files and add the art and info via EasyTag.

dvd 1.3G each

dvd - art

Use at least 300x300 ppi and some similar dimension. Give it the same name as the film file, but a JPG extension. When company arrives, they can easily peruse a collection with a file manager, or by browsing the photos in something like Geeqie.

dvd - content

Most movies (1.7 hrs) are 1.1GB (480P) and about 20 mins to back-up, assuming a person continues their other computer tasks throughout the encode. Episodes of TV shows are typically. If I have a higher-res recent DVD, I use the Fast(not Super-Fast)720p setting in Handbrake. It's 2 passes. Otherwise I used 480p Fast. run Fast The HandBrake software install (see picture below) is about 80Mb.

The rip is two parts, extraction and transcoding, and DVD structure is described here.


First, don't forget the obvious...

# pacman -S libdvdcss libdvdread libdvdnav

...since literally *none* of the players will do anything but spawn errors without explanation if these are lacking.

One fairly simple Arch solution is HandBrake.

# pacman -S handbrake

To execute, ghb which, along with icon, a person can find with ye olde...

$ pacman -Ql handbrake

...and there are flags of course, not sure where to locate.

I start HandBrake from a terminal (again, "ghb") even though it's a GUI. This is because the CSS keys take a minute or two to propagate and I can't see when they're finished within the application. Once I see the keys have propagated, I can return to GUI selection options.

dvd - storage

Probably need to think about file structure. At least like "movies, bbc, adultswim, sitcoms, detective". Or some such. Then include the scan of the cover art with the file

Wednesday, November 8, 2023

portable (usb) disk recovery

We've nearly all dropped an important HDD on the way to the airport or work and know the (sinking) feeling later that day when data can't be accessed. It's expensive, slow, and intrusive to have data recovered professionally.

So we've mostly switched to SSD's, but even these are of questionable1 reliability.

levels of loss

  • level of destruction -- unable to work at all, unable to be detected, unable to boot
  • type of drive SSD, USB, SDC, HDD
  • file system (ext2, ntfs, reiser, etc)

The easiest thing, the thing we'd like to do, is reset the dirty bit, or re-establish a corrupted MBR, and be able to plug our drive back in for normal use. Then we find that each crash can have a different level of complexity -- the dirty bit is often possible, the corrupted boot sector typically not.

Some of our luck in a crash also has to do with the file system. If a person has an HDD formatted in NTFS, then it needs a bootable NTFS sector even if it's just a portable data disk.

expectations: think data first, access second

The data crash reveals the drive to be unreliable; if I greedily aim to re-establish a boot sector, I might lose the data if the boot sector attempt fails. Check to see if the data is intact and shoot for that first, even if it's more time consuming than restoring access through a repaired boot.

software: testdisk

At the start of the fail I cycled through all my disk software, fdisk, cfdisk, gparted, ntfsfixbootand best so far seems to be testdisk. Also might take a look at wipefreespace on the AUR.

Data Recovery with Test Disk (18:22) oswyguy, 2018. This poor guy needs sunlight, but a superb TestDisk video beginning about 7:30.

WD Passport 1000GB, (1058:0748)

I employed the usuals to gather info and attempt repairs, cfdisk, fdisk, gparted, and from the AUR, . None of them did anything

pacman -S testdisk

This retrieved files, but didn't repair the MBR index.

nope

Zero
pacman -S ntfsffixboot
No
pacman -S ntfsfix

1Consider this SSD drive article, from which I quote:

According to the Western Digital's firmware update page, the impacted products are from the SanDisk Extreme Portable SSD V2, SanDisk Extreme Pro Portable SSD V2, and WD My Passport SSD line, and lists the models as follows:

SanDisk Extreme Portable 4TB (SDSSDE61-4T00)
SanDisk Extreme Pro Portable 4TB (SDSSDE81-4T00)
SanDisk Extreme Pro 2TB (SDSSDE81-2T00)
SanDisk Extreme Pro 1TB (SDSSDE81-1T00)
WD My Passport 4TB (WDBAGF0040BGY)

And these drives are still best-sellers on Amazon, so suppliers are being shady AF. SSD's rely on firmware but still must be properly constructed, of course. HDD's were mostly just a hardware situation.

Sunday, September 10, 2023

[Solved: 7 hours] reliable HDMI configuration under PulseAudio

NB: solution only takes 20 mins, but it took me an entire NFL Sunday to troubleshoot. All of this is only if the pavucontrol box cannot be expanded to include "Configuration" or nothing is there.


As we know, PulseAudio is one of the worst solutions to a non-problem1 ever devised. It's so blatantly unhelpful that I suspect the two prior, more reliable and configurable, sound systems -- OSS and ALSA -- might have been sunk by DMCA (the usual supsect in crippled media reliability). Eg, are there any OSS drivers for newer hardware? Is there any documentation about inscrutable ALSA subroutine calls? We have little choice but to live with PulseAudio these days unless we're willing to fund a project to document ALSA or update OSS drivers.

two problems, two solutions

Problem 1: HDMI cable is disconnected, no sound in host

The HDMI cable is connnected and audio is coming from the monitor. But if I disconnect the HDMI cable, audio ceases entirely instead of switching/returning to the laptop speakers. So I lose audio entirely when I disconnect the HDMI cable.

I open pavucontrol. I see this...

  1. no sound from monitor of course, b/c HDMI cable is disconnected
  2. it appears there are menu options for "Port" but "HDMI/DisplayPort Unplugged" is the only option. The arrow produces no options to return sound to speakers.
  3. re-attaching the HDMI cable only randomly results in a return to a picture and sound at the monitors

solution

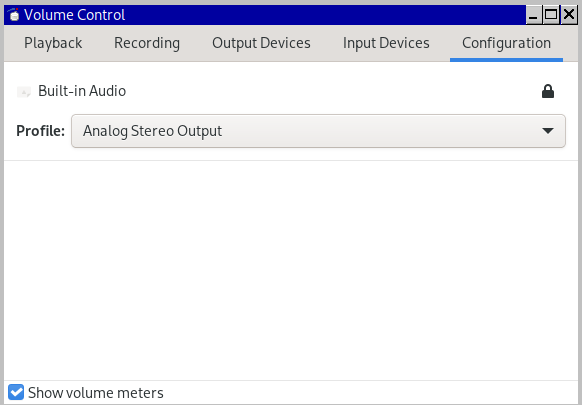
Port options are available but are hidden. Click the arrow circled in red to reveal an additional column, "Configurations".

Within "Configuration" (below), we can select different options in the drop-down menu of "Profile" ("Port" above only gave a false appearance of options). When I selected "Analog Stereo Output", audio returned to my laptop speakers.

Problem 2: HDMI cable is reconnected, no sound in monitor

Typically, our speaker audio will also stop when we reconnect the HDMI cable, so that we're once again entirely without audio. But this was a more complex problem to solve.

What worked for me was to gather device info and insert it into /usr/share/alsa/alsa.conf to make it less generic. During reconnection, my default configuration seemed unable to distinguish the correct hardware. It might have been too vague.

I first examined the HDMI connection in light of two programs.

part A -- gather aplay and xrandr info

$ aplay -l
**** List of PLAYBACK Hardware Devices ****
card 0: PCH [HDA Intel PCH], device 0: ALC3235 Analog [ALC3235 Analog]
Subdevices: 0/1
Subdevice #0: subdevice #0
card 0: PCH [HDA Intel PCH], device 3: HDMI 0 [HDMI 0]
Subdevices: 1/1
Subdevice #0: subdevice #0
card 0: PCH [HDA Intel PCH], device 7: HDMI 1 [HDMI 1]
Subdevices: 1/1
Subdevice #0: subdevice #0
card 0: PCH [HDA Intel PCH], device 8: HDMI 2 [HDMI 2]
Subdevices: 1/1
Subdevice #0: subdevice #0
$ xrandr
eDP1 connected primary 1366x768+0+0 (normal left inverted right x axis y axis) 280mm x 160mm
DP1 disconnected (normal left inverted right x axis y axis)
HDMI1 connected (normal left inverted right x axis y axis)
HDMI2 disconnected (normal left inverted right x axis y axis)
VIRTUAL1 disconnected (normal left inverted right x axis y axis)
So we can see that HDMI1, which is hw 0,7 in this system, is the subdevice we want to configure.

part B -- modify /usr/share/alsa/alsa.conf

Use the HDMI1 information gathered above to add subdevice 7 (in this case) into the alsa control file.

# nano /usr/share/alsa/alsa.conf
defaults.ctl.card 0
defaults.pcm.card 0
defaults.pcm.device 0
defaults.pcm.subdevice 7

Now when we reboot our system, and connect and reconnect HDMI cables, we should see the option (as in "1" above) in pavucontrol, AND we should see that we have an ELD handshake.

$ grep eld_valid /proc/asound/card0/eld*
/proc/asound/card0/eld#2.0:eld_valid 1
/proc/asound/card0/eld#2.1:eld_valid 0
/proc/asound/card0/eld#2.2:eld_valid 0
/proc/asound/card0/eld#2.3:eld_valid 0
/proc/asound/card0/eld#2.4:eld_valid 0
/proc/asound/card0/eld#2.5:eld_valid 0
/proc/asound/card0/eld#2.6:eld_valid 0
/proc/asound/card0/eld#2.7:eld_valid 0
/proc/asound/card0/eld#2.8:eld_valid 0

additional notes

Never works

This is a good page, however none of these work:
$ pacmd "set-default-source alsa_output.pci-0000_04_01.0.analog-stereo.monitor"
$ pacmd "set-default-sink alsa_output.pci-0000_04_01.0.analog-stereo.monitor"

slight digression

In addition to our ears, we can verify a successful EDID handshake between our laptop and the monitor (via the HDMI cable). With the HDMI cable plugged in, we have a valid HDMI connection wherever we have a "1" inside /proc/sound/. When there's no sound, it will be all zeros, such as this example...

$ grep eld_valid /proc/asound/card0/eld*
/proc/asound/card0/eld#2.0:eld_valid 0
/proc/asound/card0/eld#2.1:eld_valid 0
/proc/asound/card0/eld#2.2:eld_valid 0
/proc/asound/card0/eld#2.3:eld_valid 0
/proc/asound/card0/eld#2.4:eld_valid 0
/proc/asound/card0/eld#2.5:eld_valid 0
/proc/asound/card0/eld#2.6:eld_valid 0
/proc/asound/card0/eld#2.7:eld_valid 0
/proc/asound/card0/eld#2.8:eld_valid 0

If the HDMI cable is connected and we see the above, then either the cable is bad, or the computer is failing to detect that there's a good HDMI cable connection.

Either way, we should have sound in our (eg laptop) speakers in such cases. So back to our main story.

Sometimes works

This sometimes works to add a way to toggle between analog speakers and digital HDMI, with both plugged-in. Sometimes.

# nano /etc/pulse/default.pa
### Load analog device - must be first
load-module module-alsa-sink device=hw:0,0
load-module module-combine-sink sink_name=combined
set-default-sink combined

a few helpful commands

$ pulseaudio --kill
# alsactl restart

1 Both OSS and (subsequently) ALSA worked fine, but they needed more development as time progressed. Unfortunately, neither had enough DMCA protections to please the patent trolls. Enter PulseAudio, the *solution*, with the plausible patent deniability that it was designed to work "across platforms" LOL.

Tuesday, August 8, 2023

android usage - usb-tether

Suppose a person wants to cord-cut and obtain their internet access entirely from a tethered phone. Some of other posts have explained the configuration, but what about the data-plan? This is made somewhat inscrutable by the provider, so that a person tends toward ordering a larger plan. Let's look at the T-Mobile case.

somewhat mysterious

This is the information from the website. How much data do I use every month. At mid cycle am I at 22.28G usage, 25.08G usage, or 47.36G usage?

An hour on the 611 line with T-Mobile: the larger number, 25.08G, includes both hotspot and "voice" usage, this is my total number mid-cycle. T-Mobile uses "voice" to mean data they provide that is untethered. So "voice" isn't actually voice, it is eg., usage when driving around looking up the nearest gas station on one's phone. The 22.28G is the tethered "hotspot" usage: tethered to a laptop, a vehicle's Android connection, etc, and is the largest portion of the entire 25.08G. The untethered "voice" usage is 3.2G, the difference between the two larger numbers.

inflated values

Based on this, we can see I send about 3000 MMS/SMS a month, which would be about 100 per day. This is an overstated amount. I probably send about 25 texts per day. Similarly, they have me at about 1000 minutes of phone a month (33 mins daily) another overstatement, though not as grossly made.

But it's data that really matters to a cord cutter, b/c this is never unlimited. If my plan includes "40G hotspot", and I know I never use wifi, I just use tethering, then what is the 22.28G I have used? Is it part of the overall 25.08G used?

options online

The way we view it is important to our plan. It appears we need but how much more? Our bill will be roughly $115 per month if we cut the cord and need 100GB, or $90 per month if we can cut the cord and only need 50GB per month. But roughly, we can say to cut the cord, our costs are $100 per month phone and internet. For the gov't to track us.

usb-tether cam, mic, phone cam/mic (4G)

We might want to use and old phone as a separate video source from a different angle than a webcam. We might want to use a USB mic (not recommended w/out preamp), we migh have an extra USB cam lying about

  • /etc/udev/rules.d: as with all things USB, you'll have to identify the device and reload udev. Once you have this done, it will recognize he device when plugged in.
  • specialized software as with other linux projects, you'll probably need some software specific to that funciton

Turbo 2 - Android 7

Specs on this 4G 2015 phone include a 21MP camera- decent for video. It has about 21Gb free on the phone, but we can add up to a 64Gb microSDXC. Use at least a class 6 speed SDXC for 1080P. My original was stolen (probably at the T-Mobile outlet). A replacement was $8 (2022) for 32Gb Class 10 SanDisk.

What still works without the SIM? With a WiFi connection nearly everything but voice and text apps. Everything Google is a "go": Google Play Store, Voice etc., over Wi-Fi.

Most often, we'll just start and stop recording from the phone and download the file after. But what if we want to use it as a webcam, live via USB? Plugging in, we may get any number USB VID's based on what's chosen from the 5 phone options.

$ lsusb
Bus 001 Device 031: ID 22b8:2ea5 Motorola PCS XT1585
  • 2ea5 - "Charge this device", "Transfer files". If file transfer is selected, one can use...
    $ jmtpfs ~/mnt
    $ fusermount -u ~/mnt
    ...to move video and audio files off/on the device for further editing.
  • 2ea7 - "Transfer photos (PTP)". Don't know what PTP photo transfer is.
  • 18d1:4ee9 - "Use device as MIDI"
    $ lsusb
    18d1:4ee9 Google Inc. Nexus/Pixel Device (MIDI + debug)
    Not sure what a MIDI device is or how to use one.
  • 2e61 - "Software installation". ADB-type actions - root kits, side mounts, etc.

  • 2e25 - usb-tethered hotspot. This phone's decomissioned for hotpspotting phone data (SIM removed) but the switch is in Settings -> Wireless & networks -> More -> Mobile Hotspot & Tethering.

I could not find an option that did not require some software. I started with iVCam Webcam, which had some good instructions and might work for others. Ultimately, I found that, for Arch linux, I could yay. And of course you need to allow USB de-bugging.

This is possibly beneficial if seems to need a rule. Also may need to

# pacman -S v4l2loopback-dkms
installing v4l2loopback-dkms
(1/2) Arming ConditionNeedsUpdate...
(2/2) Install DKMS modules
==> dkms install --no-depmod v4l2loopback/0.12.5 -k 5.19.12-arch1-1
Deprecated feature: REMAKE_INITRD
==> depmod 5.19.12-arch1-1

# pacman -S v4l2loopback-utils

Monday, August 7, 2023

bibliography example

I've saved some articles and books, and put the references into a BIB file. I want a works cited (MLA) or references (APA) page at the end of an article I'm writing. What are the basics

The TEX file and the BIB file are joined at the hip and neither will compile if they're not entirely clean of syntactic errors. It's a state of near-continual anxiety.

1. the TEX file

# pacman -S texlive-bibtexextra

In the TEX heading...

\usepackage[style=mla,backend=bibtex]{biblatex}
\addbibresource{foo.bib}

In the TEX article, whenever we cite something we get the citations key number from the BIB file. In this case, lets say our citation for some article is "z023". Then...

\cite{z023}

At the end of the TEX file, just before "\end{document}"...

\printbibliography

2. The procedure

  1. check the BIB file for underscores and syntax errors. Jabref can sometimes help with this. If there are failures, just come back to this step and clean the BIB file again and again.
  2. ensure the BIB file is locatable in the \addlibresource filepath.
  3. run the TEX a first time, using the build menu "Latex -> PDF" option (pdflatex)
  4. run the TEX a second time, using the build menu "Bibtex" option (creates the BLG)
  5. run the TEX a third time using the "Latex -> PDF" option (pdflatex)

Sunday, August 6, 2023

library, bib, and pdflatex

Oh bibliographies. Yuck

do not use underscores in file names

Underscores are tidier than camel-case and I have relied on them over and over throughout the years. They met their match with LaTeX. I no longer use them for any filename in case I need to cite it in a LaTeX document.

old
20230705_smogreceipt
new
20230705smogreceipt

successful process

Using Geany or whatever...

  1. check the bib file for underscores and cleanness
  2. have the BIB file reachable by the filepath in \addlibresource
  3. run the TEX a first time, using the build menu "Latex -> PDF" option (pdflatex)
  4. run the TEX a second time, using the build menu "Bibtex" option (creates the BLG)
  5. run the TEX a third time using the "Latex -> PDF" option (pdflatex)

bibliography failures

Bibtex and/or pdflatex fail in different ways with underscores, but by far the worst problem is the cascade failure coming from bibtex. Pdflatex makes a call to bibtex and bibtex returns a BLG file. Any underscores in the "notes" field --eg filenames -- will be included, and pdflatext will reject the entire bibliography for one underscore. This is because pdflatex requires underscores to be preceeded by either a backslash or a $ (math mode). Sometimes an underscore from bibtex causes the entire PDF not to be written by pdflatex.

Accordingly, the data retention plan described in the prior post should not rely on filenaming using underscores. The URL field is the only exception. Bibtex or pdflatex will fail downstream

BIB specific fail

There's also a way bibtex can fail independently of pdflatex. In that case, it fails to send a BLG to pdflatex at all. This comes from the "crossreference" field often used by ppl to store notes about file locations of their saved journals and so on. When the Bibtex subroutine runs, it attempts to verify this location, even going through the Web or whatever. It's obviously not going to locate the thumbdrive folder that you left yourself a note about. And thus from one "crossref" failure, it will fail to produce a BLG file. Thus no bibliography.

BIB file include

Generally, author, title, date, url (can use underscores), DOI, abstract, pages, ISBN or ISSN. Leave out notes and crossref.

Populate your bib files with all the information to span whatever style you've decided upon (MLA, APA, etc), but never include or enter anything into the "crossref" field, which causes large problems when finally compiling via bibtex

This way, if a publisher does eventually look at the work, a person can reformat their TEX file to use that style of citation. Some of this is manual decision making.

Note that large organizations like grammarly.com probably are influencers and have inertia, so they might be a good resource to consider, eg this MLA v APA page. Works cited (MLA) and Reference (APA) is a key distinction. Frankly, I believe the format should be listed along with the title to keep people from being confused.

LaTeX integration of BIB

Once all of these are connected, how do we work them into our LaTeX documents. What codes do we need? How can we have consistent citations? For one thing, the document doesn't need to access the articles, just the BIB file. Yes, we need to look those, and typically save the research articles somewhere, but the document doesn't need any of that to compile, it just needs BIB file access.

In Arch, probably need the 37Mbbiblatex package to get anything to compile.

# pacman -S texlive-bibtexextra

More is described here, but the basics...

  • package -- \usepackage[style=mla,backend=bibtex]{biblatex}
  • BIB file -- underneath package \addbibresource {BIB filename}. Append the path to the filename if it's in a different directory.
  • Inline citations -- use \cite{[BIB item key]}. This can be alpha-numeric. No underscores of course.
  • Multiple BIBS -- described here.

bibliography checklist

NO UNDERSCORED ANYTHING IN ANY BIB FILE EXCEPT THE "URL" FIELD WITHIN ITS CURLY BRACES.

DO NOT SAVE ANY DOCUMENTS WITH UNDERSCORES, NOR NAME TEX OR BIB FILES WITH UNDERSCORES. Bibliographies will not print.

Order: pdflatex, bibtex, pdflatex.

Bibtex itself fails if any file in "crossref" field cannot be located within it.

Thursday, July 27, 2023

data retention

Most ppl want perpetual storage of all their personal data, and they would probably prefer that it is stored under European data privacy laws. Of course streaming one's data to a site out of the country means it will be NSA-repeated as it leaves the US. Still it is likely to have better protections once it arrives in the EU.

For those who cannot afford to physically fly their hard drives around and have them securely duplicated elsewhere, what can we do? Is there a reasonable plan? Not in any secure sense. However a partially secure solution could be to export a percentage of their data to a European Cloud server. Perhaps the line could be drawn at storing personal photos and documents on the Cloud. It's understood any government would be able to see them, run text analysis and facial recognition -- as is true anywhere data is stored -- but we'd at least have a portion of our data backed up against most any non-nuclear catastrophe.

TLDR; IME, PCloud (if one can afford it), since it's perpetual, with no subscription fees, is a reasonable unsecured solution. Here we can store photos and documents perpetually (one or two terrabytes), though can't afford enough space for video, audio, and so on. So our poor man's plan could look something like this...

  • photos and docs: PCloud. Managing docs and citations will need a database. In lieu of database, possibly can organize BIB files over collections and then use, eg jabref to keep it clean and manageable. It's unclear yet how to cite specific SMS or emails. A database or at least a spreadsheet, seems inevitable.
    Very small audio and videos (eg screen captures) which document something may possibly be kept cloud.
  • videos: HDD, SSD. There's no way for a poor man to store, or have available to edit, these media on the Cloud. What might be Cloud stored is some sort of filing spreadsheet or database table which allows the user to date-match vids (SSD), pics (cloud), and docs (cloud), if desired for a family reunion or forensics.
  • audio: HDD, SSD. Music and longer podcasts must be kept here. Too expensive for cloud storage.
  • sensitive: decision time. If documents have current PII, might want to keep on a USB key, backed-up to SSD, or something else off-cloud. Tough decision when it's OK to Cloud store. Of course, it's more convenient to have on the Cloud, but not sure that's recommendable from a safety persective.

oversight

It's as yet unclear how to database one's entire collection, but some attempt to herd the cats must be made. If one has the time and resources to implement NARA level storage plans, then some version can be followed

If database is possible, either through fiverr or some such, that's probably recommendable, since all one would need to do is occasionally make a diff database backup occasionally and keep it on the cloud. But personal files are a wide ranging "collection", and people often change file and folder names, and so forth. If that's correct, a system may be more important than capturing each file, not sure.

jabref and bibtex

$ yay -S jabref-latest

Let's take the example of emails. These are a horrible security risk and a person typically wouldn't want to archive them on the Cloud. It's equally true however that we sometimes need to archive them. Suppose we decide to archive some of them. Let's take an example for how we could manage the metadata without a database

Suppose we print-to-pdf an email conversation and and give it the filename 20230705_anytownoffice.pdf. For metadata, let's create a text file called emails.bib. This is BibTex file, using standard LaTeX formatting.

@misc{email000001,
title = "20230705_anytownoffice.pdf",
author = "homeoffice@gmail",
year = "2023",
booktitle = "{A}nytown {O}ffice {S}upply",
address= "Anytown, CA",
abstract="April-June. Regarding shipping some reams of papers. Contact was Joe Foo",
note= "folder: emails, file: 20230705_anytownoffice.PDF"

And then if a person opens the BIB file using jabref, they will have all the relevant info displayed as in a spreadsheet. So jabref can work for more than articles and books.

old DVD's

Standardize the format. A lot of old movies and episodes are 480p (DVD) and that's fine. However, they're often in MKV or WEBM containers with y9 encoding and so on. There's no way to reliably burn these back onto a DVD or even play them on most players.

Toying around, I've come up with...

ffmpeg -i oldthing.mkv -b:v 1.5M standard.mp4

... which yields about 1.3G and shows well on a large screenon the screen...

I prefer...

ffmpeg -i oldthing.mkv -b:v 2M standard.mp4

...but this yields perhaps 1.7G for a standard 1:40-1:45 film, which is a lot of space.

If a person has the time, it's even more interesting to break these larger films into a folder of 20 mins

Thursday, July 20, 2023

arch version of latex

ARCH wiki

It's sort of a PITA, but less so than going to TUG and downlading 10G or whatever is the latest. Seems like most things can be done for approximately 1G of space, though more like 2G if adding Jabref and significant Math compiling support .

Another note: to search for a specific style, when not sure which package it's in, use the "F" option in pacman. I used this to find the "ulem" package since I wanted to strike-out some text...

$ pacman -F ulem.sty
extra/texlive-plaingeneric 2023.66594-19 (texlive)
usr/share/texmf-dist/tex/generic/ulem/ulem.sty

...and then I installed "texlive-plaingeneric" 24Mb (see below)

basic

These 4 will compile most letters and articles

# pacman -S texlive-latex texlive-basic texlive-latexrecommended texlive-plaingeneric

To include any URL's (hyperref) and some math, then additionally need (150Mb):

# pacman -S texlive-latexextra

If it fails for a font size unable to compile, then add (150Mb!):

# pacman -S texlive-fontsrecommended

math

If getting serious with math (+18MB)

# pacman -S texlive-mathscience

troubleshoot

delete old aux files

Moving from one machine to another, delete the aux file if fails for being able to, eg, locate the basic letter.cls document class.

check at command line

say I have a letter thats not compiling in my api. Try it at the command line.

$ pdflatex fooletter.tex
This is pdfTeX, Version 3.141592653-2.6-1.40.25 (TeX Live 2023/Arch Linux)
(preloaded format=pdflatex)
restricted \write18 enabled.
entering extended mode
(./fooletter.tex
LaTeX2e <2022-11-01> patch level 1
L3 programming layer <2023-02-22>

! LaTeX Error: File `letter.cls' not found.
I found the answer here I think I can put paths in .Xinitrc.

bibtex

Goes in oK with the latex versions above, but consider two additionals 1, additional styles, and 2) jabref.

$ yay -S jabref-latest
$ jabref

This 280MB behomoth allows a person to easily edit their BibTex files and check for integrity of formatting and so on. Really helps with large bibliographies.

Saturday, April 1, 2023

optiplex 9020 sff details

Reliable and whisper quiet. $90 refurbed Core i7, 3.6GHz, typically manf around 2016. For sure, pacman usbutils and wireless_tools into these Optiplex's. Clear the back for ventilation

DisplayPort - $5

This is an advantage over HDMI. It splits the video from the sound, allowing a person to easily send the audio to their speaker system instead of the farking TV.

For video, purchase the DisplayPort to HDMI cable adapter $5 (above). The OS will detect the HDMI and adjust. For sound, run a standard 3.5mm audio line to the speaker system. Done.

WiFi - $15

Dell factory-configures WiFi on some MB's. None of the refurbs I've bought have it. As for USB dongles 99% of the ones on EBay are worthless Realteks RTL1881cu. Its USB signature (c811) is below. They're sold from $3 to $15 depending on how venal the seller is. The web is flooded with these pieces of garbage. I couldn't get them to work with special drivers off the AUR and wasted a day.

$ lsusb
ID 0bda:c811 Realtek Semiconductor Corp. 802.11ac NIC

We want the "au" or "bu" chipset, not the worthless "cu" chipset (above), and we'll have to pay for it. Typically, we're paying $20-30. I found an Israeli supplier. The USB signature looks like this:

$ lsusb
ID 0bda:b82c Realtek Semiconductor Corp. 802.11ac NIC

This is the Realtek RTL8822bu.

The dongle should be detected by the kernel without installing a driver, eg...

$ iwconfig
< snip >
wlp0s20u11i2 IEEE 802.11 ESSID:off/any

A quick check of CONF file accuracy inside /etc/wpa_supplicant/ and all is good.

# wpa_supplicant -i wlp0s20u11i2 -B -D wext -c /etc/wpa_supplicant/wpa_supplicant.conf
# dhcpcd wlp0s20u11i2

Nice eh? Check this out. So I went through all the steps, which are useful to learn in some circumstances. Here's a relatively important screenshot, arguably

RAM - 32G $45

My refurb came with 8Gb (2x4G cards. The MB can take up to 64. Eight Gb certainly worked (Arch w/Ice WM), however there were occasional delays with memory hogs like Chromium, so I eventually bought 4 x 8Gb cards. There are 4 x 1600Mhz 240pin DDR3 slots. Alternating banks. One bank has white clips, the other has black.

One guy's RAM upgrade.

UEFI

I changed the BIOS to allow legacy BIOS for GRUB ease.

rant: Legacy BIOS have a password option, making it very hard for a physical hacker (typically only govt) to put in a USB and quickly duplicate one's HDD/SSD. So we got UEFI: there's no impediment to LEA's. But if we turn off UEFI, we lose the ability to password protect our BIOS. This makes it easy for both civilian and gov't physical access hackers. What to do?

rant (cont): Because the gov't likes UEFI, the situation going forward will likely be *only* UEFI. A post here seems to describe the future. It's annoying AF, sorta like a perpetual tax season. /rant

Back to GRUB -- we're going to have problems. There will likely be some workarounds, perhaps like this post, or this post. But we will have to learn them. Computers used to just work, in the pre-911 world. And UEFI will always need at least gparted to handle the GPT partitioning. All our old (hard-earned) partitioning skills with MBR, cfdisk, and fdisk will be out the window. Plus we will have to trick or drill into GRUB to make it install itself properly. A lot of reading, just to be able to run a BIOS password.

Wednesday, March 22, 2023

DOC to PDF

Found an old drive. Had some docs. Who would upload these to Drive for online scanning? Had to install LibreOffice for the offline CLI solution from this page.

lowriter --convert-to pdf --outdir [output-directory] input-doc-or-docx-file

I left off the directory flag and it just put the PDF in the same directory the DOC file was in. Obviously a person can just open each document after the damage of installing the entire 700Mb LibreOffice suite for a f*cking CLI command, but that's even worse.

I will of course have zero use of use of LibreOffice proper, so this command line option is very expensive in terms of disk space, but so far only way I know to offline convert old DOC's.

Saturday, March 18, 2023

[solved] update a dormant system - arch

When a system lies around, the Arch update will of course be large. Let's say a system isn't updated for 3 years. Pacman might indicate that, say 1.5G of updates are required. Usually it can be done, but the keyserver may be a bottleneck and failure point. This is a new development. There's probably a way to update Linux without checking package integrity, but I feel that's going to ultimately be a problem. I first try everything with keys. I covered most of this in an earlier post, but the post here focuses particularly on dormant systems.

first fail

Supposing the update fails based on keys, the nice first thing do is get rid of excess packages

# pacman -Sc
Packages to keep:
All locally installed packages

Cache directory: /var/cache/pacman/pkg/
:: Do you want to remove all other packages from cache? [Y/n] y
removing old packages from cache...

Database directory: /var/lib/pacman/
:: Do you want to remove unused repositories? [Y/n] y
removing unused sync repositories...
# du -sh /var/cache/pacman
1.5G /var/cache/pacman

That last command is just to see how large the current install is without the updates. Now go after the keys.

All the apps have PGP keys; sometimes pacman won't update due to key conflicts or expiry. Usual cure...

# pacman -Sy archlinux-keyring -
...after which try the more nuclear option
# pacman-key --refresh-keys

Tuesday, February 21, 2023

some estate items - scanning concepts

Along with my father's ashes, a few boxes of family estate items arrived: clothing articles, wristwatches, analog cameras (see below), and many photos. Results? Dry-cleaning, leather restoration, protectants, watch repair, clothing alterations, and scanning. There was plenty of the lattter. Through the process, I learned that analog cameras remain useful in 2023, if a person can scan their negatives. If going this route, a person will also want to rent additional space on GDrive or buy some PCloud, probably 100G is sufficient.

scanning

A reliable, disposable document scanner reduces wear on a more expensive photo scanner, which can be used strictly for photos and slides. My two scanners, an Epson V30 and V600, had software drivers (from the AUR) that did not conflict with each other. Some ppl have scanners with drivers that conflict with other scanner drivers and will have to spend time sorting-out their software scenario.

Documents: A refurbed Epson V30 ($60). Replace now and then in order to save scanning mileage on the photo scanner. Some light vertical lines are inevitable. I run Linux; here's my software setup for the drivers.

  • if conflicts, remove other scanning drivers: eg, I had previously borrowed (see earlier post) a friend's HP MFP M424dw for which I had installed hpoj drivers from the AUR. All that HP sh*t had to be removed to avoid driver conflicts # pacman -Rsn hpoj
  • Documents - Perfection V30 (13.5 VDC) : uses the AUR iscan-plugin-gt-f720. Installs without issue.
  • Photos - Perfection V370 Photo (13.5 VDC): I also tried this scanner, since I had it laying around. I ultimately went back to a V30 for documents, but here's what I did. The AUR iscan-plugin-perfection-v370 driver is correct, but has an outdated SHA256 signature,and wouldn't install easily. A person can modify the ~/.cache/yay/iscan/iscan-plugin-perfection-v370/PKGBUILD file with the correct hash, avaliable in this page however, YAY simply downloads the latest file and overwrites the PKGBUILD modifications which again cause it to fail.
    1. attempt to $ yay iscan-plugin-perfection-v370, since the problem might now have been fixed.
    2. If it still throws the validity check fail and exits, rerun with the following flags (courtesy this page):
      $ yay -S --mflags --skipinteg iscan-plugin-perfection-v370
  • Bag: The V600 is 5.5" tall due to its two-sided lighting necessary for slides and negatives. So overall V600 is 19" x 11.5" x 5.5". The V30 is slim; 17" x 11.5" x 2". Properly padded bags are laptop size (too small) or camera gear size (too big). So we're looking at an improvised solution which will work for carrying the scanners in a car, but will not work for airline baggage check through without extensive bubble wrapping and all that BS. But still great for convenience carrying. The LL Bean Scotchlight bag is long enough, as is the Samsonite Profile model -- both tend to be expensively near $50. I found a "Protege Collapsible" sports duffel on Wal-Mart for $15. This requires rubber or bubble wrap afterwards. Ultimately I bought a Samsonite Profile used on EBay. Both scanners and their cords fit into the Samsonite Profile.

Photos: spend the money ($300) to reach a new V600.

  • Perfection V600 (24 VDC): uses the AUR iscan-plugin-gt-x820. Installs without issue.

If money's no object, get the V700. The 700 will do anything professionals need, but both have cleanable sensors; indispensable for photo/slide scanninig. This is because streaks eventually appear on any scanner, requiring sensor cleaning. On the V600 or 700, this is accessible. On less expensive versions, it's not. For example, I worked for days (disassembly, air blowing, etc) on an inexpensive "370 Photo", and never was able to rid it of streaks; I couldn't access the sensors in the consolidated scan heads. I eventually borrowed a friend's (expensive) HP MFP M426fdw (also CCD) to do photos until the V600 arrived. V600 = 19" x 11.5" x 5.5". Fits

For slides and negatives (obviates keeping photos), a specialized tray is included in the V600 and 700 - see above. To get the focus correct, the tray has focus tabs. Focus can be tweaked further using, eg, Bostik Blue Tack putty, to raise and lower slightly until perfect. See the video below from erwnalejo. My tray does 4 slides at once, and I scan at 800x800 which gives excellent results for prints (2.2Mb file / 4 pics about 550K each). For less important, but still good for archive and online, I use 400x400, providing about 1.1Mb file and about 260K per photo.

Wal-Mart: Loctite Fun-Tak pads. 2oz, $2.17. (less expensive than Bostik) EBay: Squeeze bulb dusters. $6!ea. (no chance of freezing like canned air)

remove color lines (1:14) Duncan Dimanche, 2021. V600/700 cleanable sensor locations.
V600 scanning tips (5:53) erwnalejo, 2021. Somewhere in Western Kansas. Lomo digitaliza, blue tack to adjust height. Links in comments to products. Lomo is an extra $50.
epson scanning tips (28:11) Nick Carver, 2019. Paper masks some of the holder. 5:40 uses a squeeze ball. 2400 dpi is fine for any normal use including 8.5 x 11 blowups, etc.
V600 overview (52:17) Film Friends, 2022. Comprehensive.

negatives (cont)

A few added negatives notes, since we need to address, 1) what resolution, 2) how to make postives.

First, there are obviously multiple images every scan, unlike the one-at-a-time method of photos and documents. And obviously a person must shift to the Transparency Unit from Flatbed (at least in Xsane). I do slides and negatives at 800x800 resolution, fine for archiving.

Secondly, I use GIMP2 for post-processing. A person can do GEGL Negative Darkroom (under Tools) and apparently achieve some good effects, but I have faster processing with some presets in the color curve. Eventually, a script is the way to go, but I don't have the free time currently. Script would do some version of what I do manually: A) Rotate the strip. B) Colors -> Invert (this result in a kind of bluish image). C) Run my presets in the Color curve. Here's a color slide from 1955.

GIMP: negative to positive (1:20) wilwad, 2022.
GIMP: Gegl darkroom (11:53) JonnyRobbie, 2021.

items

Old SLR's aren't worth much on the market. They're inexpensive to duplicate, so why carry these old ones around. For me, "a way to honor/remember my parents by repeating some of their activities." When I look at my wrist, my Dad's old watch dispays time in the same way it did when he looked at it. The old camera allows me to consider shots with the same pleasures and limitations he encountered. Pleasurable.

1. Olympus OM-1 MD (1977)

The OM-1 (including OM-1 MD) is a 35mm SLR which began the OM series. Battery (open with a penny, for models, see here and scroll down), on/off switch. SN 1325151 seems to be from 1977, but could be as early as 1974 or as late as 1979. It also seems to be without prism foam. However, another post, indicates prism foam must always be investigated.

Since it is the "MD" (motor-drive) version, it has a 5fps auto-drive or a single shot auto-winder. It has the black and yellow film-speed dial. As noted above in the above battery link, battery replacement is complex in 2023. One fellow hacked it. Note that there are two penny releaseable openings on the bottom. The larger one is for the battery (light-meter), the smaller one is the opening to connect the external motor drive.

light seal replacement (18:42) Li Reviews, 2022. Old light seals ruin film.
attach/remove ft lens (2:46) Caleb Ginsburg, 2021. Turn to f5.6, then turn speed selector to 400 ASA in alignment with 5.6, then push the release button. It sort of hinges from top to bottom.

leather case

Has two ears on the front which hold the camera in the case. These must be maintained to prevent cracking. Repeated soaks (remove from water just prior to any slime-ing),to get out salts then mink oil. I tried some Fiebing Mink Oil paste (6 oz, $8.29) instead of the desired Saphir.

restore old boots (23:00) Trenton and Heath, 2022. Remove from water before slime, each soak session. First 3:11 describe the soaking, and then at 19:33, the Saphir Medaille d'Or mink oil ($20)
leather satchel restore (19:19) James Berry, 2021. Saddle soap not soak to get off grime b/c too large to soak. Then Saphir.
gluing leather (13:06) Weaver Leather Supply, 2020. Avoid any water-based glues since, obviously, these reactivate with moisture. S-18 glue, contact cement and glue thinner. Another video describes Tanner's Bond and EcoWeld (same chemical).

2. Nikkormat FT (1965)

Does have a battery. In one box however was a Nikon Nikkormat FT camera, SN 4159963, probably from 1965. This is a mechanical/analog Single Lens Reflex (SLR) camera, using a prism and a mirror, he apparently bought when he was about 23 years old. He saw the world through this camera, and once I learned more about scanning negatives, I took an interest. My original thought was just to harvest the lenses for possible DSLR use.

how to load Nikkormat film (2:02) Dennis Workman, 2022. A hidden tab at the bottom of the left side. Pull down. Shutter release right next to winder.
attach/remove ft lens (2:46) Caleb Ginsburg, 2021. Turn to f5.6, then turn speed selector to 400 ASA in alignment with 5.6, then push the release button. It sort of hinges from top to bottom.

leather case

Same as with Olympus above.

3. Seiko Automatic SKX781 (2004)

In the $500 range on E-Bay, depending on the band and the condition. Nicknamed the "orange monster", of course. Self-winding, 3 position bezel: all the way out for time, middle in two directions for date or day of week. Screws down to water seal when complete.

Sunday, February 12, 2023

install -- HP Laserjet Pro MFP M426fdw (03f0:5a2a)

Continuing to look to scan without lines. My CCD Epsons (V30, V370) both have faint vertical lines -- still great for documents, but unacceptable for photos. Buddy let me use this HP MFD, since its printer doesn't work anymore and that's all he used it for. All I need are scan functions. 2007 vintage. Unfortunately MFD HP's require installing the entire HP print kludge (CUPS and HPLIP) just to use the scanner.

hardware

Standard USB scanner cable and power cord.

$ lsusb 03f0:5a2a HP, Inc HP LaserJet MFP M426fdw

software - driver

I took out the V370 software to prevent conflicts and put in the HP bloatware.

# pacman -Rsn iscan-plugin-perfection-v370
Packages (4) iscan-2.30.4.2-3 iscan-data-1.39.2.1-1 libstdc++5-3.3.6-9 iscan-plugin-perfection-v370-2.30.4-1

Total Removed Size: 2.75 MiB
$ yay -Ss hp printer
aur/hpoj 0.91-21 (+91 0.00) (Out-of-date: 2020-07-28)
Hewlett-Packard OfficeJet, PSC, LaserJet, and PhotoSmart printer multi-function peripherals (MFPs) drivers
$ yay -S hpoj
Packages (13) foomatic-db-engine-4:20220521-1 hplip-1:3.22.10-3 perl-alien-build-2.77-1
perl-alien-libxml2-0.19-1 perl-capture-tiny-0.48-6 perl-dbi-1.643-4
perl-ffi-checklib-0.31-2 perl-file-chdir-0.1011-4 perl-path-tiny-0.144-1
perl-xml-libxml-2.0208-1 perl-xml-namespacesupport-1.12-5 perl-xml-sax-1.02-1
perl-xml-sax-base-1.09-5

Total Download Size: 22.82 MiB
Total Installed Size: 38.80 MiB

software - printer

Use whatever lsusb provides, in this case 1 and 4. It should install with some Qt5 errors. This AUR version still runs on Qt5, when Qt6 is the current release.

$ hp-setup -i --auto 001:004
error: No module named 'PyQt5.QtCore'
error: Unable to load Qt4/Qt5 support. Is it installed?

error: No module named 'PyQt5.QtWidgets'
# pacman -S python-pyqt5

software - proprietary

1) uninstall the printer and fax using lpadmin (lookup its name in CUPS). 2) reinstall it again using hp-setup. This should work b/c you've now got all the Qt in place. After hp-setup, then 3) click the HP prompt to download their proprietary scanning file.

# lpadmin -x HP_LaserJet_MFP_M426fdw
# lpadmin -x HP_LaserJet_MFP_M426fdw_fax
$ hp-setup -i --auto 001:004
It's possible we can get a list of the files at Alternatively go HP website, which will auto-detect the OS from the browser of course. SMH. Anyway, just select the model, in this case

...which will simply bounce to the HPLIP. This is their goal. And now they don't have HPLIP in the form of an unzippable file. Now its a script that has to download the file itself. Data gathering, see?

software - proprietary plugin

The first scan activation (eg with xsane), HP's national security features arise. There is no way to anonymously scan. HP downloads a proprietary file, otherwise the scanner will not operate. A watermark unavailable to the naked eye will be added to all scans and the installer does not reveal where it installed on the system. There's no getting around it, but this is how to navigate it, hopefully without breaking your pacman index, like any 3rd party installer will. It does not say where these files are.

...and then choose the option here.