Showing posts with label ffmpeg. Show all posts

Thursday, July 17, 2025

2025 file issues

Attempting to backup the various media filetypes has become a nightmare, just the way WIPO-friendly attorneys want it. Even in 2025, lawsuits make it tedious AF to produce a format which plays across devices. For audio, Ye Olde MP3 is still king. For video, MP4's now contain so many different codecs that sometimes they will play, other times they do not. Typically an H264 encoding with AAC audio will still go on nearly anything.

First get a list of the installed applications, to see if any apps are necessary.

$ pacman -Qet

sample WEBM with OPUS audio

Suppose a standard download in 720p, no particular audio spec.

$ yt-dlp -S res:720 "https:foo"

So we now have this file "foo.webm", which is in a WEBM container, not an MP4 container, but we only want the audio. First we check it.

$ ffmpeg -i foo.webm
Input #0, matroska,webm, from 'foo.webm':
Metadata:
COMPATIBLE_BRANDS: iso6av01mp41
MAJOR_BRAND : dash
MINOR_VERSION : 0
ENCODER : Lavf61.7.100
Duration: 01:20:00.87, start: 0.000000, bitrate: 910 kb/s
Stream #0:0: Video: av1 (libdav1d) (Main), yuv420p(tv, bt709), 1280x720, SAR 1:1 DAR 16:9, 24 fps, 24 tbr, 1k tbn (default)
Metadata:
HANDLER_NAME : ISO Media file produced by Google Inc.
VENDOR_ID : [0][0][0][0]
DURATION : 01:20:00.834000000
Stream #0:1(eng): Audio: opus, 48000 Hz, stereo, fltp (default)
Metadata:
DURATION : 01:20:00.868000000

So the OPUS filetype is the audio. Thus, to avoid re-encoding unintentionally, we should just pull it out as an OPUS file without additional actions.

$ ffmpeg -i foo.webm -vn -acodec copy fooaudio.opus

We'd like to leave it an OPUS, but OPUS won't play on anything rolling. So, let's say 256Kb or 320Kb MP3 should do it. That's re-encode 1. We can use, eg Ocenaudio to edit the OPUS to whatever we need and save it as an MP3. I might want to touch it up further to change the speed with sox, which makes a second encode. I might turn up the volume a touch to make sure it overcomes that. Note the "C" is a capital.

$ sox -v 1.1 fooaudio.mp3 -C 320 fooaudio90.mp3 speed 0.90

Monday, March 25, 2024

color correction video

Most videos need some sort of color correction. Not even sure why. The two main ffmpeg filters are colorbalance and colorchannelmixer.

Don't forget the basic splitting and recombining commands.

colorbalance

The easiest. 9 inputs, no alpha. 3 for each color (RGB). Within each color are (similar to GiMP) shadows, midtones, highlights. So... not too bad. The opposite of Red is Cyan, opposite Green is Magenta, and opposite Blue is Yellow. You can call a thing directly, but I always do all 9.

Zero does nothing. So any of these would do nothing. I like to be in the habit of using quotes, since quotes are used with multiple filters.

$ ffmpeg -i foo.mp4 -vf colorbalance=0:0:0:0:0:0:0:0:0 unchanged.mp4

$ ffmpeg -i foo.mp4 -vf "colorbalance=0:0:0:0:0:0:0:0:0" unchanged.mp4

$ ffmpeg -i foo.mp4 -filter_complex "colorbalance=0:0:0:0:0:0:0:0:0" unchanged.mp4

$ ffmpeg -i foo.mp4 -vf colorbalance=rs=0 unchanged.mp4

The last one illustrates what's in each of the 9 positions. We can call them by RGB name or position... rs:gs:bs:rm:gm:bm:rh:gh:bh: or positions 1-9. A common one on crappy online downloads is blown out red and blue which requires both a color correction call and a saturation call.

process

The settings are very sensitive, typically a person will make changes less than 0.1. Take a screenshot from the video, open GiMP and correct it till you get it right in GiMP, then just mimic the settings in colorbalance.

A typical, fairly strong, correction might be...

$ ffmpeg -i foo.mp4 -vf colorbalance=0:0:0:-.1:0:-.1:0:0:0 rednblue.mp4

....or even less...

$ ffmpeg -i foo.mp4 -vf colorbalance=0:0:0:-0.05:0:0:0:0:0 redmild.mp4

I could have done this last one with...

$ ffmpeg -i foo.mp4 -vf colorbalance=rm=-0.05 redmild.mp4

time-saving

GiMP with a screenshot. Otherwise, start with reds, go to blues, then greens. Getting the reds correct is key, then blues to give a little yellow, and then finally will need to remove some green

gamma

About the time the colors are right, it might be too dark. That's common. I lighten it back up.

$ ffmpeg -i foo.mp4 -vf "colorbalance=-0.03:-0.05:-0.1:-0.05:-0.05:-0.1:0:0:0","eq=gamma=1.2:saturation=0.9" correct.mp4

Once I had a very minimal one...

$ ffmpeg -i foo.mp4 -vf "colorbalance=0:0:-0.03:0:0:-0.05:0:0:0","eq=gamma=1.2:saturation=0.9" correct.mp4

Sunday, January 7, 2024

ffmpeg - concatenation and edits

See also this post.

you are entering HELL if you want to join a few video clips

WHAT SHOULD BE THE SIMPLEST COMMAND IN LINUX VIDEO EDITING CAN ACTUALLY BARELY BE ACCOMPLISHED. MUCH WORSE THAN M3U ANNOYANCES. NO CLI OR GUI. MELT USUALLY FAILS WITH C LIBRARY DEFICITS. HAVE TO USE FFMPEG.

MUST CREATE A TEXT FILE WITH THE WORD "FILE" AND A HARD PATH FOR EVERY FILE TO BE JOINED IF THEY ARE NOT IN THE SAME DIRECTORY, PLACING THEM IN CONCATENATION ORDER. WANT TO TOY WITH ORDER? MAKE ANOTHER ENTIRE FILE. HOURS AND HOURS AND HOURS OF EXTRA WORK.

EVEN WORSE EVERY SINGLE VARIABLE INSIDE EVERY FILE MUST MATCH: BITRATE, PIXEL SIZE, ASPECT, CLOCK, EVERYTHING, MUST MATCH OR EVEN THIS POS METHOD WILL FAIL, WHICH IT MOST OFTEN DOES.

file '/home/foo/file1.mp4'
file '/home/foo/file2.mp4'
file '/home/foo/file3.mp4'

It's that bad. In fact the only thing this process is good for -- whenever it actually works -- is a person knows that each clip independently was fully prepped. So in case I wanted to edit them in some other order -- which happens a LOT for most ppl -- the clips might successfully bond in the new order.

The best results come from combine files with least number of renders. The best way to do this is to do your edits so you end up with a similar tbn, bitrate, and pixel size. There are other problems sometimes with fast concatenations, but the sign that all the edits are done right is that it only takes a list text file and a simple...

$ ffmpeg -f concat -safe 0 -i mylist.txt -c copy output.mp4

Even if you cut these clips from a single larger file without recompiling -- ie, we *know* the DTS and PTS are correct -- you will get shitloads of DTS ("Decoding Time Stamp") errors. The system is absolute SHIT. To avoid the DTS erros, a person would have to re-render *every single clip* BEFORE joining them with an absolute clock, eg.

$ ffmpeg -i clip2.mp4 -video_track_timescale 90000 clip2timed.mp4

...before joining the clips. Can you farking imagine?

best edit process

At least check the edits after done, prior to concatenate, to see they have a reasonably close tbn. Like if you snip off the first 10 seconds of a vid, you definitely don't want to render the vid. But if a check in ffmpeg -i shows a weird tbn, then you have to, or at least try again. eg defaults, 15232, or 11488. I usually use 15232, because I remember it. Phones typically run 90000. And if I have to do a render, I also get some other action done

$ ffmpeg -i messy.mp4 -video_track_timescale 11488 -vf "eq=gamma=1.1:saturation=0.9" output.mp4

Tuesday, August 8, 2023

usb-tether cam, mic, phone cam/mic (4G)

We might want to use and old phone as a separate video source from a different angle than a webcam. We might want to use a USB mic (not recommended w/out preamp), we migh have an extra USB cam lying about

  • /etc/udev/rules.d: as with all things USB, you'll have to identify the device and reload udev. Once you have this done, it will recognize he device when plugged in.
  • specialized software as with other linux projects, you'll probably need some software specific to that funciton

Turbo 2 - Android 7

Specs on this 4G 2015 phone include a 21MP camera- decent for video. It has about 21Gb free on the phone, but we can add up to a 64Gb microSDXC. Use at least a class 6 speed SDXC for 1080P. My original was stolen (probably at the T-Mobile outlet). A replacement was $8 (2022) for 32Gb Class 10 SanDisk.

What still works without the SIM? With a WiFi connection nearly everything but voice and text apps. Everything Google is a "go": Google Play Store, Voice etc., over Wi-Fi.

Most often, we'll just start and stop recording from the phone and download the file after. But what if we want to use it as a webcam, live via USB? Plugging in, we may get any number USB VID's based on what's chosen from the 5 phone options.

$ lsusb
Bus 001 Device 031: ID 22b8:2ea5 Motorola PCS XT1585
  • 2ea5 - "Charge this device", "Transfer files". If file transfer is selected, one can use...
    $ jmtpfs ~/mnt
    $ fusermount -u ~/mnt
    ...to move video and audio files off/on the device for further editing.
  • 2ea7 - "Transfer photos (PTP)". Don't know what PTP photo transfer is.
  • 18d1:4ee9 - "Use device as MIDI"
    $ lsusb
    18d1:4ee9 Google Inc. Nexus/Pixel Device (MIDI + debug)
    Not sure what a MIDI device is or how to use one.
  • 2e61 - "Software installation". ADB-type actions - root kits, side mounts, etc.

  • 2e25 - usb-tethered hotspot. This phone's decomissioned for hotpspotting phone data (SIM removed) but the switch is in Settings -> Wireless & networks -> More -> Mobile Hotspot & Tethering.

I could not find an option that did not require some software. I started with iVCam Webcam, which had some good instructions and might work for others. Ultimately, I found that, for Arch linux, I could yay. And of course you need to allow USB de-bugging.

This is possibly beneficial if seems to need a rule. Also may need to

# pacman -S v4l2loopback-dkms
installing v4l2loopback-dkms
(1/2) Arming ConditionNeedsUpdate...
(2/2) Install DKMS modules
==> dkms install --no-depmod v4l2loopback/0.12.5 -k 5.19.12-arch1-1
Deprecated feature: REMAKE_INITRD
==> depmod 5.19.12-arch1-1

# pacman -S v4l2loopback-utils

Thursday, July 27, 2023

data retention

Most ppl want perpetual storage of all their personal data, and they would probably prefer that it is stored under European data privacy laws. Of course streaming one's data to a site out of the country means it will be NSA-repeated as it leaves the US. Still it is likely to have better protections once it arrives in the EU.

For those who cannot afford to physically fly their hard drives around and have them securely duplicated elsewhere, what can we do? Is there a reasonable plan? Not in any secure sense. However a partially secure solution could be to export a percentage of their data to a European Cloud server. Perhaps the line could be drawn at storing personal photos and documents on the Cloud. It's understood any government would be able to see them, run text analysis and facial recognition -- as is true anywhere data is stored -- but we'd at least have a portion of our data backed up against most any non-nuclear catastrophe.

TLDR; IME, PCloud (if one can afford it), since it's perpetual, with no subscription fees, is a reasonable unsecured solution. Here we can store photos and documents perpetually (one or two terrabytes), though can't afford enough space for video, audio, and so on. So our poor man's plan could look something like this...

  • photos and docs: PCloud. Managing docs and citations will need a database. In lieu of database, possibly can organize BIB files over collections and then use, eg jabref to keep it clean and manageable. It's unclear yet how to cite specific SMS or emails. A database or at least a spreadsheet, seems inevitable.
    Very small audio and videos (eg screen captures) which document something may possibly be kept cloud.
  • videos: HDD, SSD. There's no way for a poor man to store, or have available to edit, these media on the Cloud. What might be Cloud stored is some sort of filing spreadsheet or database table which allows the user to date-match vids (SSD), pics (cloud), and docs (cloud), if desired for a family reunion or forensics.
  • audio: HDD, SSD. Music and longer podcasts must be kept here. Too expensive for cloud storage.
  • sensitive: decision time. If documents have current PII, might want to keep on a USB key, backed-up to SSD, or something else off-cloud. Tough decision when it's OK to Cloud store. Of course, it's more convenient to have on the Cloud, but not sure that's recommendable from a safety persective.

oversight

It's as yet unclear how to database one's entire collection, but some attempt to herd the cats must be made. If one has the time and resources to implement NARA level storage plans, then some version can be followed

If database is possible, either through fiverr or some such, that's probably recommendable, since all one would need to do is occasionally make a diff database backup occasionally and keep it on the cloud. But personal files are a wide ranging "collection", and people often change file and folder names, and so forth. If that's correct, a system may be more important than capturing each file, not sure.

jabref and bibtex

$ yay -S jabref-latest

Let's take the example of emails. These are a horrible security risk and a person typically wouldn't want to archive them on the Cloud. It's equally true however that we sometimes need to archive them. Suppose we decide to archive some of them. Let's take an example for how we could manage the metadata without a database

Suppose we print-to-pdf an email conversation and and give it the filename 20230705_anytownoffice.pdf. For metadata, let's create a text file called emails.bib. This is BibTex file, using standard LaTeX formatting.

@misc{email000001,
title = "20230705_anytownoffice.pdf",
author = "homeoffice@gmail",
year = "2023",
booktitle = "{A}nytown {O}ffice {S}upply",
address= "Anytown, CA",
abstract="April-June. Regarding shipping some reams of papers. Contact was Joe Foo",
note= "folder: emails, file: 20230705_anytownoffice.PDF"

And then if a person opens the BIB file using jabref, they will have all the relevant info displayed as in a spreadsheet. So jabref can work for more than articles and books.

old DVD's

Standardize the format. A lot of old movies and episodes are 480p (DVD) and that's fine. However, they're often in MKV or WEBM containers with y9 encoding and so on. There's no way to reliably burn these back onto a DVD or even play them on most players.

Toying around, I've come up with...

ffmpeg -i oldthing.mkv -b:v 1.5M standard.mp4

... which yields about 1.3G and shows well on a large screenon the screen...

I prefer...

ffmpeg -i oldthing.mkv -b:v 2M standard.mp4

...but this yields perhaps 1.7G for a standard 1:40-1:45 film, which is a lot of space.

If a person has the time, it's even more interesting to break these larger films into a folder of 20 mins

Saturday, January 21, 2023

obs and ffmpeg - animated text

In Linux, ppl are stuck with combining different applications to edit videos. We can apparently use OBS as a super-screenrecorder which we can play our FFMpeg videos and add OBS effects as it OBS records the screen.

Look back at a rudimentary prior post, or further down this page, for OBS hardware settings. Don't forget that each OBS "scene" is a collection of sources and configurations. It's good to at least have at least two "scenes"; one for voice and textovers (and then resave), and one for live streaming. OBS is versatile, but bare bones. Users must buy packs for anything they need. Add-ons are a mess. Who knows where to inventory and organize these add-ons for reinstallation. Users have to download all of the add-ons they can remember again. The hardest thing about OBS is no intuitive way to retrieve video files.

strategy

Once the clips are concatenated, transitioned, and so on in FFMpeg, we can use OBS as an enhanced screencapture tool that allows us to cut away to other docs, clips, pix, and overlays animated text, if needed. One type of text scroller (horizontal-scroll/ crawler/ chyron/ ticker) *can* be done in ffmpeg as described in vid below

horizontal scroller (3:10) The FFMpeg Guy, 2022. Does not loop but can be read either from the command, or from a created file.

fonts

Animated and static text require different types of fonts throughout a page. If we look at the professionally produced screen below, we have two different colors on names, which are also italicized. We have stretch caps on a white background above. The logo casts a shadow over the background to make the logo appear slightly lifted. We could add a scroller at bottom; it would be tricky to have a non-distracting font and probably would require occasional team logos.

For a block (possible scroller), I downloaded Vanilla Dreamers from fontspace.com, unzipped, put into /usr/share/fonts/manual, chmodded, then updated the database. It has limited symbols but looks OK.

$ chmod 644 VanillaDreamers.otf
$ fc-cache

I doubt I needed to put it into the system fonts for FFMpeg if I used a hard path in my commands. Also, overall there are too many font sites. I need to make a table I guess. Design Trends has some good ones to look at but are not downloadable.

animated text - obs

Even simply fading text in and out -- let alone basic crawlers, scrolling, etc -- is a PITA in FFMpeg.

clip editing - ffmpeg

The key here are clips already made. For real time adding audio or narration to existing clips, a person can configure a scene with audio setup to overdub in OBS.


crawler/chyron -- ffmpeg

subtitles

Supposedly more configurable than drawtext and easier to fade and such.

drawtext

horizontal scroller (3:10) The FFMpeg Guy, 2022. Does not loop but can be read either from the command, or from a created file.

We'll limp into the command with a weakly static text display and then get it moving. First, get a list of all installed fonts installed in /usr/share/fonts.

$ fc-list ':' file

If a person decides to install new fonts (eg, on the AUR, ttf-graduate-git is a good one for scrollers), then it's good to update the font database. Otherwise they won't be available to applications until the next boot.

$ fc-cache

I put the bitrate --in this case 3000Kbps -- prior to any filter to be sure it implements. Separate filters with commas. Here's a basic static display with a small reduction in gamma and saturation. We'll morph this into moving.

NB: - if you get errors check the font name. These sometimes change with updates. Eg, I've seen Cantarell-Regular.otf installed as Cantarell-VF.otf recently.

$ ffmpeg -i foo.mp4 -b:v 3M -vf "eq=gamma=1.1:saturation=0.9","drawtext=fontfile=/usr/share/fonts/cantarell/Cantarell-Regular.otf:fontsize=50:fontcolor=white:x=100:y=150:enable='between(t,5,15)':text='Friday\, January 13\, 2023'","drawtext=fontfile=/usr/share/fonts/cantarell/Cantarell-Regular.otf:fontsize=40:fontcolor=white:x=100:y=210:enable='between(t,10,15)':text='7\:01 PM PST'" 70113st.mp4

Which displays well. If the font appears in fc-list (as does Cantarell), we don't need a hard path and can shorten the path name. But a person can use a fontfile wherever it is with a hard path. For the x position to move to the left, we need a negative constant which we multiply by the clock. t is in seconds.

$ ffmpeg -i foo.mp4 -b:v 3M -vf "eq=gamma=1.1:saturation=0.9","drawtext=fontfile=Cantarell-Regular.otf:fontsize=50:fontcolor=white:x=300-40*t:y=600:text='Friday\, January 13\, 2023'" fooscroller.mp4

Starts the scroll at 300 and moves it off left at 40pix x clock speed. We could also enable it as above for a period. But instead of counting pixels for location on bottom of screen, it might be better to use something that places relatively, without counting pixels.If I subract a tenth from the height of the screen, it should place it 9/10 of the way to the bottom of the screen.

$ ffmpeg -i foo.mp4 -b:v 3M -vf "eq=gamma=1.1:saturation=0.9","drawtext=fontfile=Cantarell-Regular.otf:fontsize=50:fontcolor=white:x=300-40*t:y=(h-text_h)-(h-text_h)/10:text='Friday\, January 13\, 2023'" fooscroller.mp4

Some final adjustments: 1/10th is too high up the screen, let's divide by 28 or 30, let's start the scroller further right so it starts off the screen. Tweak the scroll speed up to 45, and decrease the font by 10. Still need a better block font.

$ ffmpeg -i foo.mp4 -b:v 3M -vf "eq=gamma=1.1:saturation=0.9","drawtext=fontfile=Cantarell-Bold.otf:fontsize=40:fontcolor=white:x=(w-text_w)-45*t:y=(h-text_h)-(h-text_h)/28:text='Friday\, January 13\, 2023'" fooscroller.mp4

start working on theclip. You'll have to bring a media source and label it something, and odds are the sound will be muted and you'll never figure that out. So just focus on whatever text you want to put in there.

OBS recording

Not as complicated as blender, but quirky and can crash. When screen and settings are arranged, record a 10 second test vid and tweak them. Once this is correct, can stream and/or record without surprises.

  • Overlays are tricky. In the video below, we can jump to 5:25 and overlays are discussed in a rudimentary manner.

    Scenes, sources, overlay (11:53) Hammer Dance, 2023. basic setup, including locking and so on. 3:15 audio information. 5:25 priority of source layers.

    Within sources, moving items up or down gives them layer priorty.
  • In the screen capture source, recorded video will be blank (black) if the captured application window, eg geeqie is made "full screen". Audio OK
  • Hold the ALT key when resizing window to cut out parts of a source. The border moves in or out of the image.

settings

Defaults are in parentheses.

  • video format (MKV): Go to Settings --> Output --> Recording Format and select MP4 (for other devices/YT uploads) or any other desired format.
  • canvas (16:9): 1920x1080 which it reduces to 1280x720 in the recording.
  • bitrate, etc: bitrate 2500K, 60fps, 1k tbn (clock). These are fine, however it might be ok to fiddle with 3M bitrate, 30 fps (unless need slomo), 15232 clock. I couldn't find where to change the clock.

Screens you may want are for clips, or to just show the screen window, allowing clips and PDF's to be shown as needed. For example.

Monday, April 25, 2022

another sample - short vid (24 seconds)

Note: TIME CALCULATOR, TEXT ANIMATOR (fade-in/out).

This post is how I manipulated a short vid, which is easy. But if a video is, say, 70 mins long, maybe I only want to keep the first 55 minutes of one of these...

$ ffmpeg -i foo.mp4 -t 55:00 -c copy output.mp4

Alternatively, perhaps I have a 4 hour and 20 minute video, from which I want to keep the final 20 minutes...

$ ffmpeg -ss 4:00:00 -i foo.mp4 -c copy part5.mp4

example

Got a couple minutes of funny video when slowed down to half speed. The audio needed to be gained up some, that was its only flaw.

Plan: cut it down to 30 while convert to MP4, slow audio to half speed, split audio to clean and gain. Recombine. Observe closely and cut down to 24. Add fade-in, fade out. Upload and laugh.

1. cut down to 30 and convert to MP4

Trivial to convert containers -- do it when cutting.

$ ffmpeg -i original.mkv -t 00:30 -c copy short.mp4

2. slow audio and video

Halve both the audio and video speeds, as seen in the video beneath the command.

$ ffmpeg -y -i short.mp4 -filter_complex "[0:v]setpts=2.0*PTS[v];[0:a]atempo=0.5[a]" -map "[v]" -map "[a]" halfspeed.mp4

half-speed example (3:28) The FFMPEG guy, 2021. Does audio, video, then both audio and video. Reveals filter complex mapping.

3. split audio and video

Separation was necessary in this case b/c the audio was a little dirty. I needed to work on it independently.

$ ffmpeg -i halfspeed.mp4 -vn -ar 44100 -ac 2 audio.wav
$ ffmpeg -i halfspeed.mp4 -c copy -an video.mp4

4. recombine audio and video

I force the bitrate -- ffmpeg's default is too low. I like 3M for sports, 2M for interview or person just talking.

$ ffmpeg -i video.mp4 -i audio.wav -b:v 3M combined.mp4

5. review and cut to 24 secs

Watch in slow motion to obtain a cut time, in this case 24 seconds. Then a repeat of #1 (except no container change).

$ ffmpeg -i combined.mp4 -t 00:24 -c copy short24.mp4

6. fade-in and fade-out (1 second)

There are several ways to do this. The fade filter can be used by frame, or by seconds. So if I want to use the frame number, I need to find the FPS and take that time the number of seconds to the effect. I use "st" for seconds and "s" for the frame. This one uses seconds.

$ ffmpeg -i short24.mp4 -vf fade=in:st=0:d=1,fade=out:st=23:d=1 -b:v 3M faded24.mp4

fade-in fade-out example (3:42) The FFMPEG guy, 2021. Does fade-in(frames), fade-out (seconds), and then both (frames)

7. upload to YT

I've had good luck with....

  • 30 FPS
  • MP4
  • 1920x1080 (FHD/2K) or 1280x720 (WXGA/HD)
  • 3M or 2M b:v
  • h264 high (c:v libx264)
  • aac audio

audio note: if using a WAV as an input, ffmpeg defaults the audio to AAC, 124Kb. Change the bitrate with b:a 192k, and the encoder to MP3 with c:a libmp3lame. I usually upload as with AAC as YouTube does some converting that "seems" to make MP3 uploads slightly less crisp than AAC uploads, not sure.

Basic $ ffmpeg/ffprobe -i command to get info on a media file cannot be grepped to find, say, various libs. It's annnoying but ffmpeg/ffprobe sends to stderr not stdout. Of course error can't be can't be piped. Error must be rerouted. Gotta use 2>&1. Eg, to verify libmp3lame...

$ ffmpeg -i foo.mp4 2>&1 | grep mp3

...and if there's any result from that, it's in there somewhere.

Saturday, March 26, 2022

video -- text

Side note: to turn off annoying inactivity blanking, say when using a non-VLC player...

$ xset s -dpms

And then to restore it (if desired)....

$ xset s dpms

Some ppl find they have to add "$ xset s" entries "noblank" and/or "off", that is to use all three. In vanilla Arch for example, all three are required


This post is a trail of crumbs for incorporating graphic, moving text into video -- a long term, continually evolving project. There are also some screenwriting notes at the bottom, since scripts are sometimes scrolled or portions used for graphics, etc.This top portion reviews subtitles, and a previous post (1/2021), wherein I addressed the basics of static titles or labels. The subtitle information includes both user-selected, and forced subtitles. So there's a lot to cover this post: subtitles, basic labeling, graphic text.

subtitles

Subtitles can be added to videos in an optional or forced capacity. Here's a page.

There are many subtitle formats, however we want our player to be able to use them. I see these most often and they have somewhat different applications.

  1. SRT from the SubRip days. This is the most common but appears to only have bold, italic and underline.
  2. ASS the most expressive, according to the last post in this thread. Fonts colors, etc. I've never used it.

extract subtitles

Get the subtitle (.SRT) file from the video and look it over, update it, re-imbed it, etc

$ ffmpeg -i foo.mp4 somename.srt

To extract them from YouTube videos, where a person might have seen a foreign film can require more reading. Typically they're just in English and will come in a VTT file, received with the following:

$ youtube-dl --all-subs --skip-download [URL]

For playback viewing of the SRT or VTT file, the best bets are 1) VLC and 2) the subtitle file in the same folder as the video. When playing the video in VLC, find "Subtitle" in the VLC menu bar, and simply select the subtitle file.

For embedding the SRT or VTT file into the video itself, rendering is obviously necessary.

For extracting audio from a YT URL, which is a faster/smaller download, it's better to use yt-dlp. A description is here. For example, the post indicates that "0" is the best quality between 0-5. Knowing this, the download can be made smaller yet, with a lower bitrate.

$ yt-dlp -f bestaudio -x --audio-format mp3 --audio-quality 0 "URL"

Sometimes video downloads indicate they will be huge -- 5 or 6G or more. This happens when the video is 2 or 4K resolution. I'm typically satisfied with 720P however. When I encounter these immense downloads, I specify the lower resolution as described here. A much smaller file and a faster download.

$ yt-dlp -S res:720 "URL"

from prior post*

*The 1/2021 post. NB: Embedding text is a CPU intensive render, it's useful to verify system cooling is unobstructed.

To render one (or more) line of text, use the "drawtext" ffmpeg filter. Suppose the video date and time, in Cantarell font, in the upper left hand corner, is to be displayed for 6 seconds. We can use ffmpeg's simple filtergraph (noted by "vf"). 50 pt font should be sufficient size for 1920x1080 video.

$ ffmpeg -i video.mp4 -vf "[in]drawtext=fontfile=/usr/share/fonts/cantarell/Cantarell-Regular.otf:fontsize=50:fontcolor=white:x=100:y=100:enable='between(t,2,8)':text='Monday\, January 17, 2021 -- 2\:16 PM PST'[out]" videotest.mp4

Notice that a backslash must be added to escape special characters: Colons, semicolons, commas, left and right parens, and of course apostrophe's and quotation marks. For this simple filter, we can also omit the [in] and [out] labels. Here is a screenshot of how it looks during play.

Next, supposing we want to organize the text into two lines. We'll need one filter for each line. Since we're still only using one input file to get one output file, we can still use "vf", the simple filtergraph. 10pixels seems enough to separate the lines, so I'm placing the second line down at y=210.

$ ffmpeg -i video.mp4 -vf "drawtext=fontfile=/usr/share/fonts/cantarell/Cantarell-Regular.otf:fontsize=50:fontcolor=white:x=100:y=150:enable='between(t,2,8)':text='Monday\, January 18\, 2021'","drawtext=fontfile=/usr/share/fonts/cantarell/Cantarell-Regular.otf:fontsize=50:fontcolor=white:x=100:y=210:enable='between(t,2,8)':text='2\:16 PM PST'" videotest2.mp4

We can continue to add additional lines of text in a similar manner. For more complex effects using 2 or more inputs, this 2016 video is the best I've seen.

Ffmpeg advanced techniques pt 2 (19:29) 0612 TV w/NERDfirst, 2016. This discusses multiple input labeling for multiple filters.

PNG incorporation

If I wanted to do several lines of information, an easier solution than making additional drawtexts, is to create a template the same size as the video, in this case 1980x1080. Using, say GiMP, we could create picture with an alpha template with several ines that we might use repeatedly, and save in Drive. There is then an ffmpeg command to superimpose a PNG over the MP4.

additional options (scripts, text files, captions, proprietary)

We of course have other options for skinning the cat: adding calls to text files, creating a bash script, or writing python code to call and do these things.

The simplest use of a text files are calls from the filter in place of writing the text out each filter.

viddyoze: online video graphics option. They reender it on the site, but it's not a transparent overlay, but a 720p MP4.

viddyoze review (14:30) Jenn Jager, 2020. Unsponsored review. Explains most of the 250 templates. Renders to quicktime (if alpha), or MP4 is not.~12 minute renders

screenwriting

We of course need a LaTeX format, but then...

Answer these 6 Questions  (14:56) Film Courage, 2021. About, want, get it, do about it, does/doesn't work, end.
PBX - on-site or cloud  (35:26) Lois Rossman, 2016. Cited mostly for source 17:45 breaks down schematically.
PBX - true overhead costs  (11:49) Rich Technology Center, 2020. Average vid, but tells hard facts. Asteriks server ($180) discussed.

Monday, February 14, 2022

stream and record - obs and ffmpeg 1

Links: OBS site w/forums

A high-speed internet connection is foundational for streaming, but what are some other considerations? Some live stream sites (YouTube, Discord, Glimesh) will need an OBS type app on the user's system to format a stream to transmit to their site. Other sites (Zoom) have a proprietary streaming app, but the app experience can sometimes be enhanced by routing it through an OBS-type app. A third issue is the various streaming protocols and site authentications. A fourth issue is hardware problems which can be specific to a streaming app. All this complexity allows for multiple problems and solutions.

Note: a fifth issue is that OBS is natively setup for the notorious Nvidia hardware and the PulseAudio software. Detection of audio is particularly difficult without PulseAudio, eg requiring JACK config.

protocols and authentication

RTMP streaming providers typically require a cell number via the "security" (forensic record) requirement of 2FA requiring a cell. This is an immense safety issue. Who knows how these providers tie cell numbers to credit reports, "trusted 3rd parties", etc? The answer is consumers are expected to understand a multi-page "privacy" policy filled with legalistic language and equivocations, which regularly changes, and which varies from site to site. Way to protect us Congress, lol. Accordingly, since I essentially have no idea what they're doing with my cell, I try to avoid streaming services which require a cell.


Although they require a cell*, YouTube's advantage is streaming directly from a desktop/laptop with nothing beyond a browser. Discord can do similarly with limited functionality, and they have a discord app which adds features. Glimesh works well with OBS -- it provides a stream key for OBS, or whatever a person is using.

*YouTube requires "account verification" at https://www.youtube.com/verify prior to streaming. The verification is 2FA to a cell.

obs

Those not intending to use OBS can still find utility in its attempts to stream or record. A great deal will be revealed about one's system. OBS logs are also valuable to identify/troubleshoot problems, eg the infamous 'ftl_output' not found issue -- you'll find it in the logs (~/.config/obs-studio/logs). OBS can encounter a couple of problems.

obs hardware issue: nvidia graphics card

Obviously, no one wants NVidia hardware: the associated bloatware is almost unbearable. However, its use is so common that many users have it in their system(s). OBS therefore makes Nvidia the default. This setting spawns errors for systems with AMD Radeons. Change the "NV12" (or 15 by now) circled below to an option which works for one's hardware.

1. obs audio problem - alsa and jack

Most desktops unfortunately have two audio systems: an MB chip, and a graphics card chip. Difficulty can arise when one source is needed for mic input, and the the other source is needed for playback (eg, for HDMI). This is bad enough. However there's an additional problem with OBS -- it doesn't detect ALSA. Your options are PulseAudio (gag), or JACK (some config work, depending). I end up using a modified PulseAudio. More about that here.

1. obs local configuration and usage: to MP4

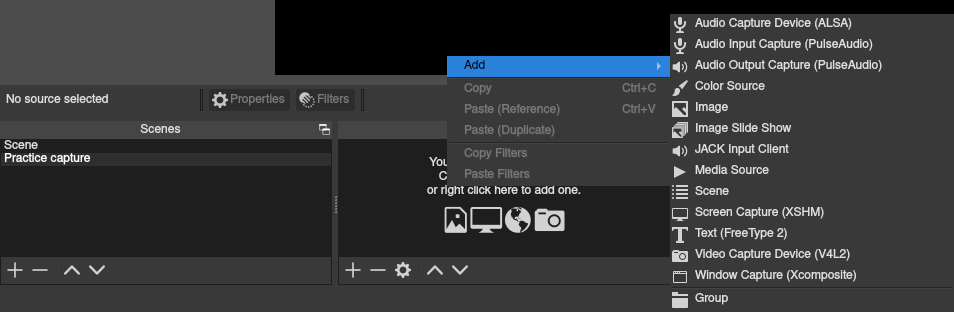
Fffmpeg works great for screen and input captures, but OBS can be preferable for more mixing in during live. In OBS terminology "scenes" and "sources" are important words. Scenes is a collection of inputs (sources). OBS is good at hardware detection, but files can be played, websites shown, hardware (cams, mics), images (eg for watermarks) other videos, and so on. For making MP4's "Display Capture" is obviously an important source.

Scenes and Sources (8:08) Hammer Dance, 2021. How to add the scenes and sources to them.

V4L2 issues

1. loopback issue

Unimportant, though you might find it in the OBS logs

v4l2loopback not installed, virtual camera disabled.

The solution steps are here.

  • v4l2loopback-dkms: pacman. basic loopback. This makes a module, so you need to do, pacman -S linux-headers prior to the loopback. install.
  • v4l2loopback-dc-dkms: AUR. haven't tried this one. apparently allows connecting an Android device and using it as a webcam via wifi

We're not done because the loopback device will takeover /dev/video0, denying use of our camera. So we need to configure our loopback to run on /dev/video1. This has to be specified by putting a load-order file into /etc/modules-load.d/ .

Install the loopback, if desired.

# pacman -S v4l2loopback-dkms

2. ftl_output issue

This is one is important.

$ lsmod |grep video
uvcvideo 114688 1
videobuf2_vmalloc 20480 1 uvcvideo
videobuf2_memops 20480 1 videobuf2_vmalloc
videobuf2_v4l2 36864 1 uvcvideo
videobuf2_common 65536 2 videobuf2_v4l2,uvcvideo
videodev 282624 4 videobuf2_v4l2,uvcvideo,videobuf2_common
video 53248 3 dell_wmi,dell_laptop,i915
mc 65536 4 videodev,videobuf2_v4l2,uvcvideo,videobuf2_common

If we haven't installed loopback, then video0 is the default. Note this is verified by the lack of any settings or capabilities returned on video1.

$ v4l2-ctl --list-devices
Integrated_Webcam_HD: Integrate (usb-0000:00:14.0-2):
/dev/video0
/dev/video1
/dev/media0
$ v4l2-ctl -l -d 0
brightness 0x00980900 (int) : min=-64 max=64 step=1 default=0 value=0 contrast 0x00980901 (int) : min=0 max=95 step=1 default=0 value=0 saturation 0x00980902 (int) : min=0 max=100 step=1 default=64 value=64 hue 0x00980903 (int) : min=-2000 max=2000 step=1 default=0 value=0 white_balance_temperature_auto 0x0098090c (bool) : default=1 value=1 gamma 0x00980910 (int) : min=100 max=300 step=1 default=100 value=100 gain 0x00980913 (int) : min=1 max=8 step=1 default=1 value=1 power_line_frequency 0x00980918 (menu) : min=0 max=2 default=2 value=2 white_balance_temperature 0x0098091a (int) : min=2800 max=6500 step=1 default=4600 value=4600 flags=inactive sharpness 0x0098091b (int) : min=1 max=7 step=1 default=2 value=2 backlight_compensation 0x0098091c (int) : min=0 max=3 step=1 default=3 value=3 exposure_auto 0x009a0901 (menu) : min=0 max=3 default=3 value=3 exposure_absolute 0x009a0902 (int) : min=10 max=626 step=1 default=156 value=156 flags=inactive
$ v4l2-ctl -l -d 1
[nothing]

However, even with this default correct, there is a ftl_output error remaining which prevents an output video stream.

$ yay -S ftl-sdk

plug-ins

OBS has plugins, for example one that shows keystrokes and mouse clicks.

Streaming and Recording(11:08) Gaming Careers, 2019. OBS based tutorial, using the computer, not a capture card.
GoPro to WiFi(page) Action Gadgets, 2019. Used GoPros can work as well as newer cams.

settings - device

repurposed cams

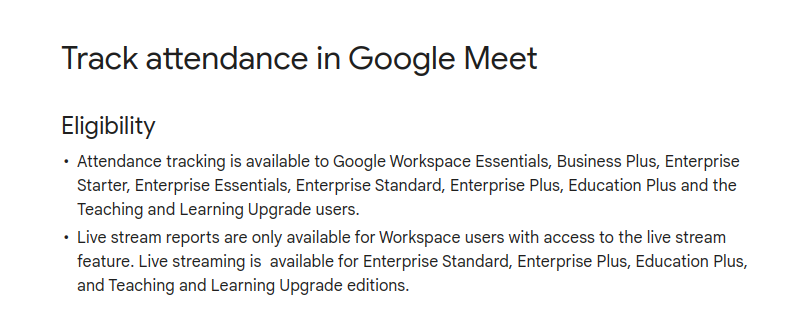
attendance

  • meet: only in highly paid plans beginning about $12 per month (2023). The higher level educator plans also.
  • zoom: only in paid plans
  • teams: only in paid plans - teames is part of microsoft360 business suite
  • webex: webex is inherently pay-only

Streaming and Recording(11:08) Gaming Careers, 2019. OBS based tutorial, using the computer, not a capture card.

Friday, February 11, 2022

another sample video edit (screencast) w/B-roll

In April of 2020, I wrote a Picture in Picture blogpost, using ffplay to show everything on a desktop and then a ffmpeg screen capture to get all of them. We can do these more simply if just capturing one at a time. The video below from Luke Smith, is a good review of the commands, even though 2017.

Simple screencast (12:05) Luke Smith, 2017. Linux based. Simple ways to capture both webcams and screens (get their names from /dev ) and to-the-point.

In addition,I like to do cutaways to B-roll while keeping the audio going, so the best way is usually for me to make the entire video and overlay a narration after complete.

1. Video

screen usually :0.0

Active window can't be captured -- have to do the whole screen or do a bunch of offset information for some window. I don't bother. For capture, use the -f tag instead of the usual "i", because it's not a file, it's a format, x11grab. The input file will be the default tty, :0.0, set the size the usual "-s" way -- I typically leave off the bottom 30 pixels to keep off my taskbar. Get the size from xrandr, here lets say it was 1366x768...

$ ffmpeg -s 1366x738 -f x11grab -i :0.0 somefile.mp4

webcam usually /dev/video0

With the webcam, I add a bitrate -- start around 2M -- if it looks a little teary.

$ ffmpeg -i /dev/video0 -b:v 2M somefile.mp4

USB cam usually /dev/video2

Not always /dev/video1, and it's hard to find a reliable device list command. I usually try video1 and 2 -- a USB is often "2". The problem with ffmpeg -devices or (if you hate that big banner) ffmpeg -hide-banner -devices, is that only lists the programs that run them, not the hardware

$ ffmpeg -i /dev/video2 -b:v 2M somefile.mp4

2. Audio added (usually 0,0)

Note: I like to adjust mic volumes in alsamixer to get them just right. However, since we know that PulseAudio is a kludge, I sometimes must fall back to "Input Devices" in pavucontrol. Something like the setting below typically works without clipping.

This command give a huge list, some might find helpful.

$ pactl list sources

audio and screen

After reading this page, I find that simply adding it to the screen is awesome. So here was the basic command from above...

$ ffmpeg -s 1366x738 -f x11grab -i :0.0 somefile.mp4

...and then add the hw device from aplay -l, typically 0,0, and whatever codec/bitrate shit...

$ ffmpeg -s 1366x738 -f x11grab -i :0.0+0,0 -f alsa -ac 2 -i pulse -acodec aac -b:a 192k somefile.mp4

This above is a gold standard, and also in some cases mic 0,1 is available. Pick whichever one is better. There's also a way to make this simpler, which works in some cases...

$ ffmpeg -s 1366x738 -f x11grab -i :0.0 -f pulse -ac 2 -i default -acodec aac -b:a 192k somefile.mp4

audio and webcam

With the webcam, it also works fine

$ ffmpeg -i /dev/video0 -f pulse -ac 2 -i default -b:a 192k -b:v 2M somefile.mp4

audio sink

To real-time mux application sounds and microphone is slightly annoying: it appears users are forced to create a virtual microphone. Further, re-establishing the virtual mic is required after reboot or update. Also the order related apps are used appears to be important to sync audio and video.

$ pactl list sinks short

3. b-roll

There are multiple problems and solutions. The largest problem: maintain sync of narrator's mouth-2-speech, when cutting back and forth from b-roll. There are three ffmpeg solutions for me; sometimes I pull from all three:

  • overlay b-roll onto completed videos: Complete video with narration. Overlay video-only clips (so doesn't silence the narration) with 100% opacity.
  • complete all video without human speaking shots. Overlay narration final step: this works especially well if narrator need not be seen, so no syncing to mough movements. It's easy to overlay a consistent human, or AI (eg. Speechelo), track over the video.
  • chunk it: create several clips with narrator at start of chunk, ending chunk with b roll and narrators voice-over. Be sure to use same mic settings talking over b-roll. Compile all these clips into one longer video. Appears as if going back and forth from narrator to b-roll.

Luke Smith has a video that hints at some of these solutions, and then the second link gets at it a little more difrectly

some ffmpeg features (7:42) Luke Smith, 2021. Stabilizing, horizontal display, syncing scripts.
overlaying videos ffmpeg (page), 2019.

Wednesday, February 2, 2022

ffmpeg - zoom, ticker, xfade transitions, python

1. Tech videos often use a terminal screen, zoom in or out on some element, and then slide-transition to the speaker

2. Tech videos often cutaway from the narrator to a terminal (or other B-roll). However, how to keep voice synced when return to narrator?

1. zoom

This video has a slower, more dramatic, zoom. But we can decrease the number of seconds to "1" for a better effect.

zoom and pan example (5:10) The FFMPEG guy, 2021. Moves in directly, but also does corners.

2. ticker

The first question is how much text we need to scroll. If we want a ticker smoothly scrolling throughout a video, it seems we'd want to include a ticker filter only on the final edit: we don't want to have to match-up the ticker with the next clip's ticker. However, the ffmpeg command to add the ticker includes the text in the CLI -- the amount of text to scroll for an entire video might be 30 or 40 lines. So we'll want ffmpeg to call to a text file containing our ticker text, unless we've only got a very short ticker.

The second question is if we need our ticker to loop or only run once.

ticker example (3:09) The FFMPEG guy, 2021. Starts simple and progresses through polished effects.

3. transitions

The transitions in this post use the amazing xfade filter. But for a complete list of the filters in one's ffmpeg installation:

$ ffmpeg -filters |grep xfade

xfade points

  • OTT verse list with 5 second clips of each.
  • jitter solved for a zoom around 2:16 the solution in the zoom jitter is to add a scale flag that varies with the video resolution.
    scale=12800x7200
    ... this number match the video resolution later in the same command...
    s=1280x720

4. slow audio and video

This would halve both the audio and video speeds, as seen in the video beneath it. In this one, I also happened to convert the container to MP4.

$ ffmpeg -y -i normalspeed.mkv -filter_complex "[0:v]setpts=2.0*PTS[v];[0:a]atempo=0.5[a]" -map "[v]" -map "[a]" halfspeed.mp4

half-speed example (3:28) The FFMPEG guy, 2021. Does audio, video, then both audio and video. Reveals filter complex mapping.

I have a couple other posts that touch on ffmpeg transitions, but more needed to be done. The filters are complex and you just can't learn them all fast enough. A post is needed to gather

two prior posts

These were made when I attempted to do Picture in Picture (PIP) videos.

1. PIP screencast 1 (2020) Begins with PIP comands but moves into some ffmpeg
2. PIP screencast 2 (2020) Post is mostly all ffmpeg commands.

clip organization

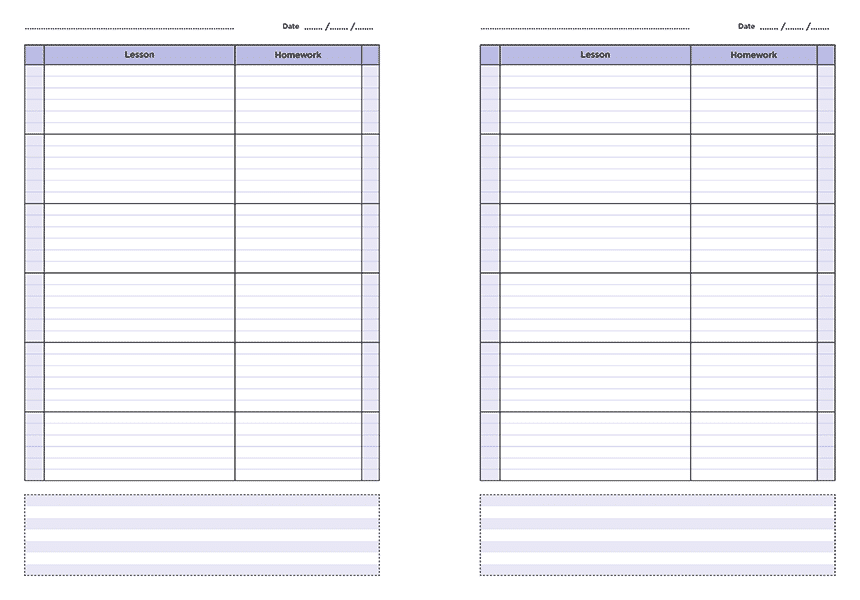
In order to be efficient with editing, a set of columns for figuring the time offsets on the transitions and audio is helpful. I've used Google Sheeets for the 6 columns, and the result looks useful for a large project with a hundred clips, or for a neat looking business setup. But it's overkill for a hommade 10 minute video with 5-10 clips. It takes longer to enter spreadsheet data than paper, pen and a calculator. The back of an old envelope is fine or, if attempting to keep track of edits, Day-Timer has the Teacher's Planner. The pages are similar to this: 

I write all of the clips on the left, then as I concatenate them into larger clips, I put them more to the right. The movement is from left to right. I can parenthesis and put music at far right. Transitions are noted between each clip.

mixed media

Some clips are complex. For example, for a 5 second intro, I might need JPG's that fade into something with moving text, and with music and other audio mixed in. There also might be animation. If there's panning in the JPG's, then that needs to be noted in my clip editor also. A Teacher's Planner will keep these organized, and I can scan in the pages if I prefer a record. For the graphical text, Viddyoze is fairly cost effective, and for narration Speechelo (blastersuite) is cost effective, although they do attempt to upsell.

python

ticker example (20:14) PyGotham2014, 2014. Old, out of sync, but conceptually penetrating.

Tuesday, October 26, 2021

slowing video and audio

If possible, concatenate the entire video project MP4, and then do a final pass for speed and color changes.

concatenation method

To complete by simple concatenation of clips, with hard cuts, a list of clips in a TXT file and the "concat" filter will do the trick without rendering.

$ ffmpeg -f concat -safe 0 -i mylist.txt -c copy output.mp4

Put the text file in the directory with the clips or do absolute paths to them. The file is simple; each video is one line and takes the syntax:

$ nano mylist.txt
# comment line(s)
file video1.mp4
file '/home/foo/some-other-video.mp4'

Obviously, transitions which fade or dissolve require rendering; either way, starting with a synced final video, with a consistent clock (tbr), makes everything after easier.

concat codec

If using ffmpeg, then mpeg2video is the fastest lib, but also creates the largest files. Bitrate is the number one file-size determiner and what libx264 can do at 3M, takes 5M in mpeg2video. Videos with a mostly static image, like a logo, may only require 165K video encoding. A 165K example w/125K audio, 6.5MB for about 5 minutes.

biggest problems

If I'm going to change the speed of the video, and I only need the audio to stay synced, without a change in pitch, then it's trivial. But if I want the audio to drop or rise in pitch and still stay synced, the video typically must be split apart and the audio processed in, eg. sox. That said...

  • video artifacts: sometimes revealed. Interlace lines or tearing. ffmpeg yadif filter
  • playback: will recoding still playback on the original device? For ffmpeg, mpeg2video is the most reliable.
  • complexity and time investment: speed ramps, portions, complex filters -- all difficult with linux software
  • audio pitch: easiest is to change speed without changing audio sound. Pitch is more complicated. sox changes pitch when slowing, apts and atempo do not. Which will you need?

verify the streams in containers

We need this step to sort which streams our nav packets, video, and audio, reside on. In Linux, ffmpeg is nearly unavoidable, so assuming its use. Solciting ffmpeg information results in two numbers, the file number input, and the stream number. For example, ffmpeg -i result "0:0", means first file, first stream, "0:1", means first file, second stream, and so forth. MP4 files can contain multiple streams. Examining an AVI will only result in a single audio and video stream, per file.

deinterlace and tear solutions

Deinterlacing is the horizontal lines problem, tearing is the chunks of stuff. There are extremely good, but extremely slow deinterlace filters, but for me, the low-CPU filter yadif is typically fine. For tearing, I increase the bitrate to at least 4M. Here's a way to do both. For simplicity, not showing audio here.

$ ffmpeg -i input.mp4 -f dvd -vf "setpts=1.8*PTS,yadif" -b 4M -an sloweroutput.mp4

Although multiple filters, I didn't need 'filter complex' because only one input.

single command slowing

The decision point here is about audio pitch -- do you want the pitch to change when changing the audio? If no pitch change, either asetpts or atempo work fine. I like atempo. If need to recode, the basic mpeg2video video codec is the fastest, lightest lib going.

  • pitch change: So far, I can't do it. To get it right with a pitch change, I have to split-out audio and video, use sox on the audio, and recombine. I can never get ffmpeg filter, "atempo", to accmplish the pitch change. Eg. I slow the video to half speed using "setpts=2*PTS", then attempt to drop the audio pitch in half, "-af atempo=0.5". It processes without errors, and syncs but with zero pitch change.
  • no pitch change: "asetpts". It will adapt the audio, sometimes with strange effects, to the new speed, but the pitch will still be whatever.The timebase and so on will still be perfect sync with audio.

pitch change with sox (audio only)

Sox default is to change pitch when slowing or accelerating. Speeding-up audio is easier to match with video, since slowing the video is a repeating number. Sox can do four decimal places of precision(!)

17% slowing, w/pitch change.

$ ffmpeg -i input.mp4 -vf "setpts=1.2*PTS,yadif" -b:v 5M -vcodec copy -an slowedoutput.mp4
$ sox input.wav slowedoutput.wav speed 0.8333
$ ffmpeg -i video.mp4 -i audio.wav -vcodec copy recombined.mp4

30% slowing and pitch change.

$ ffmpeg -i input.mp4 -vf "setpts=1.5*PTS,yadif" -b:v 4M -vcodec copy -an slowedoutput.mp4
$ sox input.wav slowedoutput.wav speed 0.667
$ ffmpeg -i video.mp4 -i audio.wav -vcodec copy recombined.mp4

An output made 20% faster, and pitch change, that syncs perfectly.

$ ffmpeg -i input.mp4 -vf "setpts=0.8*PTS" -b:v 4M -vcodec mpeg2video fasteroutput.mp4
$ sox input.wav fasteroutput.wav speed 1.25
$ ffmpeg -i video.mp4 -i audio.wav -vcodec copy recombined.mp4

bitrate C flag

Sox defaults to 128Kb, so need the "C" flag. Eg to get 320K and slow it to 92%...

sox foo.wav -C 320 foo90.mp3 speed 0.92

pulling from DVD

Be sure to install libdvdcss

single title, "VTS_01_2.VOB".
vobcopy -i /run/media/foo/SOMETITLE -O VTS_01_2.VOB -o /home/foo/SOMEFOLDER
entire disc:

problems

On occasion, if you backup a DVD, you don't need the nav stream anymore and you'll have extra work on filters if you leave it in.
$ ffmpeg -i input.mp4
Input #0, mpeg, from 'input.mp4':
 Duration: etc
 Stream #0:0[0x1e0]: Video: mpeg2video (Main), yuv420p(tv, etc) 
 Stream #0:1[0x80]: Audio: ac3, 48000 Hz, stereo, fltp, 192 kb/s
 Stream #0:2[0x1bf]: Data: dvd_nav_packet

Delete the audio and data streams:

ffmpeg -i input.mp4 -map 0:v -c copy output.mp4

Thursday, January 21, 2021

sample video edit (less than 1 minute)

Side Note: TIME CALCULATOR. This post is FFMPEG, but there's a UAV guy who has a YT channel, who works nearly exclusively with SHOTCUT. Some of the effects are amazing, eg his video on smoothing. There's also an FFMPEG webpage with pan tilt and zooming info not discussed this post. For smoother zooming, look here at pzoom possibilities. Finally, for sound and video sync, this webpage is the best I've seen. Sync to the spike.


Suppose I use a phone for a couple short videos, maybe along the beach. One is 40 seconds, the other 12. On the laptop I later attempt to trim away any unwanted portions, crossfade them together, add some text, and maybe add audio (eg. narration, music). This might take 2 hours the first or second attempt: it takes time for workflows to be refined/optimized for one's preferences. Although production time decreases somewhat with practice, planning time is difficult to eliminate entirely: every render is lossy and the overall goal (in addition to aesthetics) is to accomplish editing with a minimum number of renders.

normalizing

The two most important elements to normalize before combining clips of different sources are the timebase and the fps. Ffmpeg can handle most other differing qualities: aspect ratios, etc. There are other concerns for normalizing depending on what the playback device is. I've had to set YUV on a final render to get playback on a phone before. But this post is mostly about editing disparate clips.

Raw video from the phone is in 1/90000 timebase (ffmpeg -i), but ffmpeg natively renders at 1/11488. Splicing clips with different timebases fails, eg crossfades will exit with the error...

First input link main timebase (1/90000) do not match the corresponding second input link xfade timebase (1/11488)

Without a common timebase, the differing "clocks" cannot achieve a common outcome. It's easy to change the timebase of a clip, however it's a render operation. For example, to 90000...

$ ffmpeg -i video.mp4 -video_track_timescale 90000 output.mp4

If I'm forced to change timebase, I attempt to do other actions in the same command, so as not to waste a render. As always, we want to render our work as few times as possible.

separate audio/video

Outdoor video often has random wind and machinery noise. We'd like to turn it down or eliminate it. To do this, we of course have to separate the audio and video tracks for additonal editing. Let's take our first video, "foo1.mp4", and separate the audio and video tracks. Only the audio is rendered, if we remember to use "-c copy" on the video portion, to prevent video render.

$ ffmpeg -i foo1.mp4 -vn -ar 44100 -ac 2 audio.wav
$ ffmpeg -i foo1.mp4 -c copy -an video1.mp4

cropping*

*CPU intensive render, verify unobstructed cooling.

This happens a lot with phone video. We want some top portion but not the long bottom portion. Most of my stuff is 1080p across the narrow portion, so I make it 647p tall for a 1.67:1 golden ratio. 2:1 would also look good.

$ ffmpeg -i foo.mp4 -vf "crop=1080:647:0:0" -b 5M -an cropped.mp4

The final zeroes indicate to start measuring pixels in upper left corner for both x and y axes respectively. Without these, the measurement starts from center of screen. Test the settings with ffplay prior to the render. Typically anything with action will require 5M bitrate on the render, but this setting isn't needed during the ffplay testing, only the render.

cutting

Cuts can be accomplished without a render if the "-c copy" flag is used. Copy cuts occur on the nearest keyframe. If a cut requires the precision of a non-keyframe time, the clip needs to be re-rendered. The last one in this list is an example.

  • no recoding, save tail, delete leading 20 seconds. this method places seeking before the input and it will go to the closest keyframe to 20 seconds.
    $ ffmpeg -ss 0:20 -i foo.mp4 -c copy output.mp4
  • no recoding, save beginning, delete tailing 20 seconds. In this case, seeking comes after the input. Suppose the example video is 4 minutes duration, but I want it to be 3:40 duration.
    $ ffmpeg -i foo.mp4 -t 3:40 -c copy output.mp4
  • no recoding, save an interior 25 second clip, beginning 3:00 minutes into a source video
    $ ffmpeg -ss 3:00 -i foo.mp4 -t 25 -c copy output.mp4
  • a recoded precision cut
    $ ffmpeg -i foo.mp4 -t 3:40 -strict 2 output.mp4

2. combining/concatentation

Also see further down the page for final audio and video recombination. The section here is primarily for clips.

codec and bitrate

If using ffmpeg, then mpeg2video is the fastest lib, but also creates the largest files. Videos with a mostly static image, like a logo, may only require 165K video encoding. A 165K example w/125K audio, 6.5MB for about 5 minutes. That said, bitrate is the primary determiner of rendered file size. Codec is second but important, eg, libx264 can achieve the same quality at a 3M bitrate for which mpeg2video would require a 5M bitrate.

simple recombination 1 - concatenate (no render)

The best results come from combine files with least number of renders. This way does it without rendering... IF files are the same pixel size and bit rate, this way can be used. Put the names of the clips into a new TXT file, in order of concatenation. Absolute paths is a way to be sure. Each clip takes one line. The one here shows both without and with absolute path.

$ nano mylist.txt
# comment line(s)
file video1.mp4
file '/home/foo/video2.mp4'
The command is simple.
$ ffmpeg -f concat -safe 0 -i mylist.txt -c copy output.mp4

Obviously, transitions which fade or dissolve require rendering; either way, starting with a synced final video, with a consistent clock (tbr), makes everything after easier.

simple recombination 2 - problem solving

Most problems come from differing tbn, pixel size, or bit rates. TBN is the most common. It can be tricky though, because the video after the failing one appears to cause the fail. Accordingly comment out files in the list to find the fail, then try replacing the one after it.

  1. tbn: I can't find in the docs whether the default ffmpeg clock is 15232, or 11488, I've seen both. Most phones are on a 90000 clock. If the method above "works", but reports many errors and the final the time stamp is hundreds of minutes or hours long, then it must be re-rendered. Yes it's another render, but proper time stamps are a must. Alternatively, I suppose a person could re-render each clip with the same clock. I'd rather do the entire file. As noted higher up in the post, raw clips from a phone usually use 1/90000 but ffmpeg uses 1/11488. It's also OK to add a gamma fix or anything else, so as not to squander the render. The example here I added a gamma adjustment
    $ ffmpeg -i messy.mp4 -video_track_timescale 11488 [or 15232] -vf "eq=gamma=1.1:saturation=0.9" output.mp4

combine - simple, one file audio and video

I still have to specify the bitrate or it defaults too low. 3M for sports, 2M for normal person talking.

$ ffmpeg -i video.mp4 -i audio.wav -b:v 3M output.mp4

combine - simple, no audio/audio (render)

If the clips are different type, pixel rate, anything -- rendering is required. Worse, mapping is required. Leaving out audio makes it slightly less complex.
ffmpeg -i video1.mp4 -i video2.flv -an -filter_complex \ "[0:v][1:v] concat=n=2:v=1 [outv]" \ -map "[outv]" out.mp4
Audio adds an additional layer of complexity
ffmpeg -i video1.mp4 -i video2.flv -filter_complex \ "[0:v][0:a][1:v][1:a] concat=n=2:v=1:a=1 [outv] [outa]" \ -map "[outv]" -map "[outa]" out.mp4

combining with effect (crossfade)

*CPU intensive render, verify unobstructed cooling.

If you want a 2 second transition, run the offset number 1.75 - 2 seconds back before the end of the fade-out video. So, if foo1.mp4 is a 12 second video, I'd run the offset to 10, so it begins fading in the next video 2 seconds prior to the end of foo1.mp4. Note that I have to use filter_complex, not vf, because I'm using more than one input. Secondly, the offset can only be in seconds. This means that if the first video were 3:30 duration, I'd start the crossfade at 3:28, so the offset would be "208".

$ ffmpeg -i foo1.mp4 -i foo2.mp4 -filter_complex xfade=transition=fade:duration=2:offset=208 output.mp4

If you want to see how it was done prior to the xfade filter, look here, as there's still a lot of good information on mapping.

multiple clip crossfade (no audio)

Another scenario is multiple clips with the same transition, eg a crossfade. In this example 4 clips (so three transitions), each clip 25 seconds long. A good description.

$ ffmpeg -y -i foo1.mp4 -i foo2.mp4 \
-i foo3.mp4 -i foo4.mp4 -filter_complex \
"[0][1:v]xfade=transition=fade:duration=1:offset=24[vfade1]; \
[vfade1][2:v]xfade=transition=fade:duration=1:offset=48[vfade2]; \
[vfade2][3:v]xfade=transition=fade:duration=1:offset=72" \
-b:v 5M -s wxga -an output.mp4
Some additional features in this example: y to overwrite prior file, 5M bitrate, and size wxga, eg if reducing quality slightly from 4K to save space. Note that the duration mesh time increases the total offset cumulatively. I touched a TXT file and entered the values for each clip and its offset. Then just "cat"ted the file to see all the offset values when I built my command. Suppose I had like 20 clips? The little 10ths and so on might add up. Offset numbers off by more than a second will not combine with the next clip, even though syntax is otherwise correct.
$ cat fooclips.txt
foo1 25.07 - 25 (24)
foo2 25.10 - 50 (48)
foo3 25.10 - 75 (72)
foo4 (final clip doesn't matter)

multiple clip crossfade (with audio)

This is where grown men cry. Have a feeling if I can get it once, won't be so bad going forward but, for now, here's some information. It appears some additional programs beide crossfade and xfade.

fade-in/out*

*CPU intensive render, verify unobstructed cooling.

If you want a 2 second transition, run the offset number 1.75 - 2 seconds back before the end of the fade-out video. Let's say we had a 26 second video, so 24 seconds.

$ ffmpeg -i foo.mp4 -max_muxing_queue_size 999 -vf "fade=type=out:st=24:d=2" -an foo_out.mp4

color balance

Recombining is also a good time to do even if just a basic eq. I've found that general color settings (eg. 'gbal' for green) have no effect, but that fine grain settings (eg. 'gs' for green shadows) has effects.

$ ffmpeg -i video.mp4 -i sound.wav -vf "eq=gamma=0.95:saturation=1.1" codec:v copy recombined.mp4

There's an easy setting called "curves", like taking an older video and moving midrange from .5 to .6 helps a lot. Also, if bitrate is specified, give it before any filters; bitrate won't be detected after the filter.

$ ffmpeg -i video.mp4 -i sound.wav -b:v 5M -codec:v mpeg2video -vf "eq=gamma=0.95:saturation=1.1" recombined.mp4

Color balance intensity of colors. There are 9 settings - 1 each for RGB (in that order) for shadows, midtones, and highlights, separated by colons. For example, if I wanted to decrease the red in the highlights and leave all others unchanged...

$ ffmpeg -i video.mp4 -i -b:v 5M -vf "colorbalance=0:0:0:0:0:0:-0.4:0:0" output.mp4

A person can also add -pix_fmt yuv420p, if they want to make it most compatible with Windows

FFMpeg Color balancing(3:41) The FFMPEG Guy, 2021. 2:12 color balancing shadows, middle, high for RGB
why films are shot in 2 colors  (7:03) Wolfcrow, 2020. Notes that skin is the most important color to get right. The goal is often to go with two colors on oppposite ends of the color wheel or which are complementary.
PBX - on-site or cloud  (35:26) Lois Rossman, 2016. Cited mostly for source 17:45 breaks down schematically.
PBX - true overhead costs  (11:49) Rich Technology Center, 2020. Average vid, but tells hard facts. Asteriks server ($180) discussed.

adding text

*CPU intensive render, verify unobstructed system cooling.

For one or more lines of text, we can use the "drawtext" ffmpeg filter. Suppose we want to display the date and time of a video, in Cantarell font, for six seconds, in the upper left hand corner. If we have a single line of text, we can use ffmpeg's simple filtergraph (noted by "vf"). 50 pt font should be sufficient size in 1920x1080 video.

$ ffmpeg -i video.mp4 -vf "[in]drawtext=fontfile=/usr/share/fonts/cantarell/Cantarell-Regular.otf:fontsize=50:fontcolor=white:x=100:y=100:enable='between(t,2,8)':text='Monday\, January 17, 2021 -- 2\:16 PM PST'[out]" videotest.mp4

Notice that a backslash must be added to escape special characters: Colons, semicolons, commas, left and right parens, and of course apostrophe's and quotation marks. For this simple filter, we can also omit the [in] and [out] labels. Here is a screenshot of how it looks during play.

Next, supposing we want to organize the text into two lines. We'll need one filter for each line. Since we're still only using one input file to get one output file, we can still use "vf", the simple filtergraph. 10pixels seems enough to separate the lines, so I'm placing the second line down at y=210.

$ ffmpeg -i video.mp4 -vf "drawtext=fontfile=/usr/share/fonts/cantarell/Cantarell-Regular.otf:fontsize=50:fontcolor=white:x=100:y=150:enable='between(t,2,8)':text='Monday\, January 18\, 2021'","drawtext=fontfile=/usr/share/fonts/cantarell/Cantarell-Regular.otf:fontsize=50:fontcolor=white:x=100:y=210:enable='between(t,2,8)':text='2\:16 PM PST'" videotest2.mp4

We can continue to add additional lines of text in a similar manner. For more complex effects using 2 or more inputs, this 2016 video is the best I've seen.

Ffmpeg advanced techniques pt 2 (19:29) 0612 TV w/NERDfirst, 2016. This discusses multiple input labeling for multiple filters.

PNG incorporation

If I wanted to do several lines of information, an easier solution than making additional drawtexts, is to create a template the same size as the video, in this case 1980x1080. Using, say GiMP, we could create picture with an alpha template with several ines that we might use repeatedly, and save in Drive. There is then an ffmpeg command to superimpose a PNG over the MP4.

additional options (scripts, text files, captions, proprietary)

We of course have other options for skinning the cat: adding calls to text files, creating a bash script, or writing python code to call and do these things.

The simplest use of a text files are calls from the filter in place of writing the text out each filter.

viddyoze: proprietary,online video graphics option. If no time for Blender, pay a little for the graphics and they will rerender it on the site.

viddyoze review (14:30) Jenn Jager, 2020. Unsponsored review. Explains most of the 250 templates. Renders to quicktime (if alpha), or MP4 is not.~12 minute renders

adding text 2

Another way to add text is by using subtitles, typically with an SRT file. As far as I know so far, these are controlled by the viewer, meaning not "forced subtitles" which override viewer selection. here's a page. I've read some sites on forced subtitles but haven't yet been able to do this with ffmpeg.

audio and recombination

Ocenaudio makes simple edits sufficient for most sound editing. It's user friendly along the lines of the early Windows GoldWave app 25 years ago. I get my time stamp from the video first.

$ ffmpeg -i video.mp4

Then I can add my narration or sound after being certain that the soundtrack is exactly a map for the timestamp of the video. I take the sound slightly above neutral "300" when going to MP3 to compensate for transcoding loss. 192K is typically clean enough.

$ ffmpeg -i video.mp4 -i sound.wav -acodec libmp3lame -ar 44100 -ab 192k -ac 2 -vol 330 -vcodec copy recombined.mp4

I might also resize it for emailing, down to VGA or SVGA size. Just change it thusly...

$ ffmpeg -i video.mp4 -i sound.wav -acodec libmp3lame -ar 44100 -ab 192k -ac 2 -vol 330 -s svga recombined.mp4
$ ffmpeg -i video.mp4 -i sound.wav -acodec libmp3lame -ar 44100 -ab 192k -ac 2 -vol 330 -vcodec copy recombined.mp4

I might also resize it for emailing, down to VGA or SVGA size. Just change it thusly...

$ ffmpeg -i video.mp4 -i sound.wav -acodec libmp3lame -ar 44100 -ab 192k -ac 2 -vol 330 -s svga recombined.mp4

For YouTube, there's a recommended settings page, but here's a typical setup:

$ ffmpeg -i video.mp4 -i sound.wav -vcodec copy recombined.mp4

ocenaudio - no pulseaudio

If a person is just using alsa, without any pulse, they may have difficulty (ironically) using ocenaudio, if HDMI is connected. A person has to go into Edit->preferences, select the ALSA backend, and then play a file. Keep trying your HDMI ports until you luck on the one with EDID approved.

audio settings for narration

To separately code the audio in stereo 44100, 192K, ac 2, some settings below for Ocenaudio: just open it and hit the red button. Works great. Get your video going, then do the audio.

Another audio option I like is to create a silent audio file exactly the length of the video, and then start dropping in sounds into the silence, hopefully in the right place with audio I may have. Suppose my video is 1:30.02, or 90.02 seconds

$ sox -n -r 44100 -b 16 -c 2 -L silence.wav trim 0.0 90.02

Another audio option is to used text to speeech (TTS) to manage some narration points. The problem is how to combine all the bits into a single audio file to render with the audio. The simplest way seems to be to create the silence file then blend. For example, run the video in a small window, open ocenaudio and paste at the various time stamps. By far the most comprehensive espeak video I've seen.

How I read 11 books(6:45) Mark McNally, 2021. Covers commands for pitch, speed, and so on.

phone playback, recording

The above may or may not playback on a phone. If one wants to be certain, record a 4 second phone clip and check its parameters. A reliable video codec for video playback on years and years of devices:

-vcodec mpeg2video -or- codec:v mpeg2video

Another key variable is yuv. Eg,...

$ ffmpeg -i foo.mp4 -max_muxing_queue_size 999 -pix_fmt yuv420p -vf "fade=type=out:st=24:d=2" -an foo_out.mp4

To rotate phone video, often 90 degree CCW or CW, requires the "transpose" vf. For instance this 90 degree CCW rotation...

$ ffmpeg -i foo.mp4 -vf transpose=2 output.mp4

Another issue is shrinking the file size. For example, mpeg2video at 5M, will handle most movement and any screen text but creates a file that's 250M for 7 minutes. Bitrate is the largest determiner of size, but also check the frame rate (fps), which sometimes can be cut down to 30fps ( -vf "fps=30") if it's insanely high for the action. Can always check stuff with ffplay to get these correct before rendering. Also, if the player will do H264, then encoding in H264 (-vcodec libx264) at 2.5M bitrate looks similar to 5M in MPEG2. Which means about 3/5 the file size.

Saturday, August 1, 2020

keyframes

Links: keyframe :: (wikipedia) keyframe is an "I" frame -- intraframe. types of frames :: (wikipedia) I, P, & B frames.

These blog posts are application oriented. Sometimes however, a little theory helps the application. Simply stated,keyframes are a type of i-frame manually added by a user editing a video, increasing the total i-frame count of a video.

i-frames

Video cameras record a chronological procession of pictures, frame by frame. They do so with 3 types of frames: i, p, and b. The i-frames are complete pictures, like a photo, of what is being recorded. As the camera records, it takes an i-frame and then several P or B frames, and then another i-frame, and so on. The P or B frames refer to an associated I-frame to complete the picture during playback. The Wikipedia graphic below showes the sequence. The i,p, b-frame schema was created to save memory space.

Most video devices insert i-frames about every 8 seconds or every 240 frames or so (I shoot mostly 30fps) when recording video. Newer codecs set these intervals dynamically: shorter intervals when action increases, and longer intervals when action decreases. H264 comes to mind.

keyframes

When software users edit video effects, say a dissolve transition, their editing software adds an i-frame to the beginning and end of the effect. These post-recording, user-added i-frames are in addition to the existing i-frames embedded by their camera during recording. Only these post-recording, user inserted i-frames are properly termed "keyframes".

Further nomenclature confusion can arise when software uses proprietary terms for key or i-frame intervals. For example, in ffmpeg, i-frame intervals are called GOP's "Groups of Pictures", and without regard to whether they are between key or i-frames.

raw video analysis

When I import uncut clips, I first-off detect and save all the i-frame time stamps to a file I can refer to when editing. If it's a simple edit without transition, and all my cuts are at i-frames, I might not need to add keyframes and re-encode the video. How do I get a list of i-frame time stamps? Suppose I have a clip, "foo.mp4".

$ ffprobe -loglevel error -skip_frame nokey -select_streams v:0 -show_entries frame=pkt_pts_time -of csv=print_section=0 foo.mp4 >iframes_foo.txt 2>&1
The output intervals will be timestamps, which we can easily see by catting the file.
$ cat iframes_foo.txt
0.000000
4.771433
10.410400
18.752067
27.093733
...

To determine the exact frame number (always an integer) of the i-frame, multiply the time stamp by the recording FPS. I can determine the FPS using a basic $ ffprobe foo.mp4. In this example, it revealed a 29.97 FPS. So...

29.97 x 4.771 = 142.99 or frame 143.
29.97 x 10.4104 = 311.99 or frame 312.
29.97 x 18.7521 = 561.99 or frame 562.

...and so on. We could write a short program to calulate this or export it into Excel/Gnumeric/Sheets. But this is for only a single clip and of course I want this information for each of my clips.

repair - ffmpeg

Sometimes, the keyframes become unmanageable for some reason and need to be cleaned. Typically re-encoding is required. But there is a methodology.